Rewrite in the workz?

I did not want to remove the steering rack to replace the inner tie rods or pay the dealer $500 to replace the tie rod ends.
I was looking to see if I wanted tp try to save a few hundred bucks by replacing my inner tie rod ends myself. I couldn't find any info so here we go....
Vehicle: 99 Mitsubishi Galant GTZ with 180K miles
Time for right side is 1.5 hours, left side is 45 min.
Most pictures from one side, there are some photos mixed in from the other side.
The only special tool was a $5 modified crows foot wrench, that I grinded down to fit the inner tie rod. Size 1-1/4" crows foot wrench.


Rewrite in the workz?


The long skinny screwdriver from Sears 19 pcs set
I used this exact screwdriver! Proved particularly useful, fits perfectly into the compression ring. Also used for other things. Invaluable tool.

Now use the long screw driver to pound out the retainer ring in the back of the inner tie rod. Its a pretty maleable, so a lighter firm tapping will unbend it. There's a top and bottom, so you have to do this twice. You can turn your steering wheel to gain further access.
Here's my foot and bent retainer ring


@#%&*!
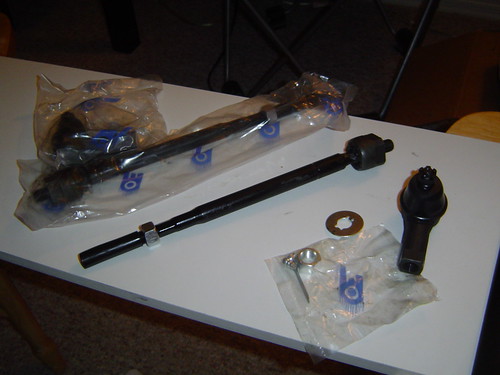
Compare parts. This is where I previously got a wrong part, delaying my repair for a week waiting for correct part to be shipped. Advance auto 99 tie rod arm($20) was shorter; 00 is longer($60) which is shown below. I got it through the mail for less.


Measure the lenght of the old tie rod, the new parts should closely match this length to maintain alignment. My new outer tie rod is sized differently so I can't use the nut to measure length.


To remove the boot I cut the old tie rod with a grinder.


Ready for installation!


Access is difficult, turn steering wheel accordingly so you can get the right angle to hammer down the lock washer over the flat part of the inner tie rod from underneath the vehicle with the long screwdriver(red arrow). I am able to do only one side because access to the other side is impossible.
Then I installed the boot and reused the old retainer ring, you could use a large hose clamp from Lowe's. See how difficult access is?


The outer tie rod is straight forward. Tighten nut and install cotter pin.
Elapsed time is 1.5 hours, the other side took half the time.
Wasn't so bad, now I can use the saved money for something else!
I replaced my broken sway bar links as well, I had to grind the old ones off, and the new ones installed pretty easily.
Tips: You can do this yourself. Makes sure you have the right parts before you start, craw under the car with the new part and compare them. You might need another sized crows foot wrench for your new part.
I test drove the car and it never felt so smooth and vibration free and no more funky rattling!
I hope this helps people out.
very good tutorial.....lol i got the same set of tie rods....didn't have to modify the crows wrench but then again I have an 02....tie rod separator is helpful...lock washer is really tough theres really not that much of space in there...use the large hose clamps way easier then the original retainer bands... 8)

Hey guys, I recently bought a set of inner/outer Tie rods. So far by reading this tut, it seems fairly easy although I got one concern. For the inner tie rod, the edge of the side that connects to the car, is a huge square.
As mentioned in this tutorial, the crow's foot wrench is used for this, but man is it hard to find in my local auto stores. If I cant find it locally, i may have to get it online, which im trying to avoid.
Is there another alternative to the crowfoot wrench?

Mitsubishi Galant '99
i4
174k trans. 30k engine
all stock.
Thanks for the tutorial. I just did this and it wasn't too bad at all. i got my crow's foot online at amazon I think. Thanks again!
})({ Heather })({

- "If you never take risks, you'll have a wasted soul."
Bookmarks