 Log in
 Register
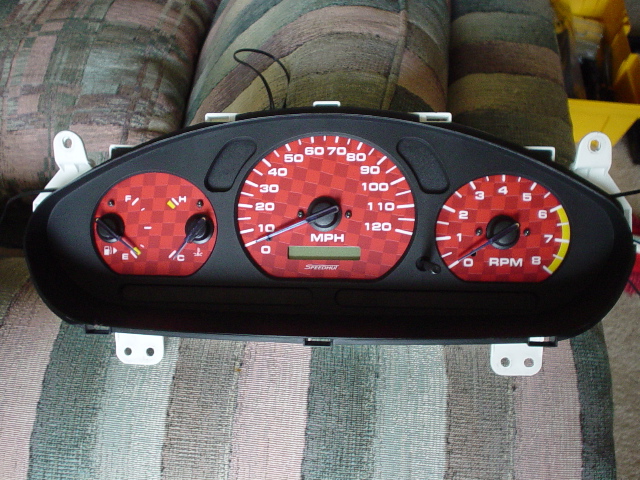

 Reply With Quote
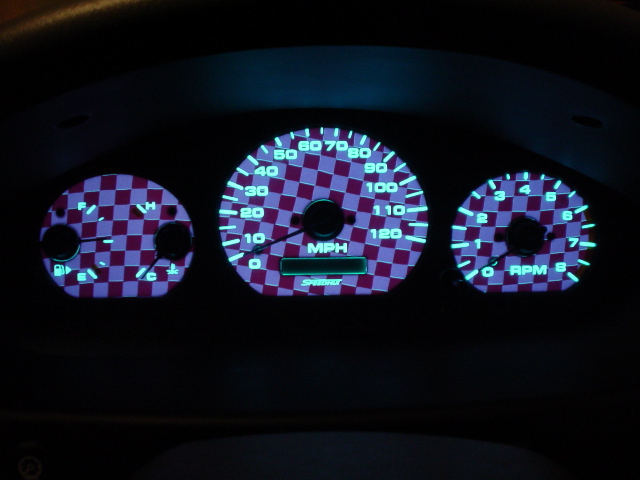
nice.. i like the day light setup.. not sure about.. night.


Here's my new speedhut reverse-el gauges
I would def. rec. these to people who can't see their dash at night like I couldn't. The dash is so bright now on max! Anyway a few tips. They want you to tap 12v power. Use the green wire with white line that is attached to the dimmer switch by the steering wheel as your 12v power. This will turn off the dash lights like normal and not keep them on all the time like I did before by accident. Also, I had to cut apart my old gauges to get them off not to damage the needles so this is a semi-permanent mod. Other than that they rock.
(keywords for search: dash, gauge, install, wire, power, indiglo)


nice.. i like the day light setup.. not sure about.. night.
AkA K h O p A r I.
I Am back BitcheZzZ
<div class='quotetop'>QUOTE(K h O p A r I)</div><div class='quotemain'>nice.. i like the day light setup.. not sure about.. night.</div>
Yeah, I messed around on their site for days trying to find what I liked. The picture at night isn't as purple as it looks like bad saturation from non-night shooting camera. Also, I forgot to let everyone know. You still need your stock bulbs to light the needles. Next fix ... ah
I'm having problems just trying to splice the wires together (The ones for the dimmer). This is becoming a hardcore pain in the nuts. I suck at electronics.
<div class='quotetop'>QUOTE(Calipso)</div><div class='quotemain'>I'm having problems just trying to splice the wires together (The ones for the dimmer). Â*This is becoming a hardcore pain in the nuts. Â*I suck at electronics.</div>
takes time I would rec. getting a good crimper/shearer. anyway use pass through connectors where the power wire goes on and you can stick in a second.
L
<div class='quotetop'>QUOTE(Liszt)</div><div class='quotemain'><div class='quotetop'>QUOTE(Calipso)</div><div class='quotemain'>I'm having problems just trying to splice the wires together (The ones for the dimmer). Â*This is becoming a hardcore pain in the nuts. Â*I suck at electronics.</div>
takes time I would rec. getting a good crimper/shearer. anyway use pass through connectors where the power wire goes on and you can stick in a second.
L</div>
Still having a problem with just splicing them together. I got the tap in adaptors that were recommended by BGR but the wires are way too thick to fit in the adaptor. This is really aggrivating. :x
I gotta work tonight and I probably won't have my gauges done because I cant' get them frigging wires together.
Oh yea well my family had a crimper but it's lost. I'm pretty much wondering how this is gonna be done because those adaptors really suck and won't fit any of the green wire from the dimmer.
those look nice.just wondering if they come in any other color?

<div class='quotetop'>QUOTE(Calipso)</div><div class='quotemain'>Oh yea well my family had a crimper but it's lost. Â*I'm pretty much wondering how this is gonna be done because those adaptors really suck and won't fit any of the green wire from the dimmer.</div>
You need to use the patented Chip Method for splicing wires. Take your wire stripper and carefully cut the insulation on the green and white wire and slip the insulation back . The object is to cut the INSULATION ONLY, not the wire. Once you have the wire exposed, twist the power wire from the gauges around the bare wire. Put on a piece of shrink wrap, solder it or use electrical tape to close the connection and you're done. I hate tap and squeeze connectors. I wire everything this way and only use Butt connectors when necessary. It works, trust me.
Chip
2000 Basalt Black Metallic GTZ
(Paint Code: Porsche LC9Z)
Genuine experience carries a lot more credibility than the ability to answer a question.

if you are gonna get the tap in connectors taht bgr suggested, get the red ones not the blue ones. the blue ones are too big. the red ones would work better.
but yea, another method for tapping power. strip the end of your wires, and twist the exposed wire really good. then just stick the end of the wire into the hole where the original wires for the dimmer switch go into the plug for the dimemr switch. make sure the lights turn on and then just zip tie the wires together so they don't move. no cutting needed.
speedhut gagues are fully custom. listen, this splicing thing doesn't need to be done, just use self splicing connectors. It's easy, just place the original wire in the connector so it goes in and out and take the new power wire and stick it in. then take a pair of pliers and push down the metal piece in the middle, then close the plastic thing and done. as far as stripping wires and using butt connectors that's harder. I can understand that you are having prob. taking the plastic sheath off of small wires. sometimes what i do is just use a pair of needle nose pliers to slowly/carefully work away at the plasic but that's why I suggested a good pair of crimpers as the cheap ones don't do a really good job at taking the outer plastic off (they take some wire with it) but anyway you should just need to use this connector below and maybe a spade connector for the ground. btw the gauges didn't light up unless they were grounded (common for most devices but some don't need to be, just fyi)Originally Posted by SilverKnight

yup, you should have no problem finding what you like.
myspace.com/xxxJ3ffReYxxx
TEAM TGCLV
TEAM DOWNFORCE
LVEVO.org
It would be nice but the green wire (For the dimmer) is way to f'n thick to fit through the metal peice of the tap in connectors. Not to mention the dimmer wires don't move too far which leaves not alot of room to manuver with.
i agree with mah boi kho!
Diego
 Posting Rules


Bookmarks