The Galant Center - Powered by vBulletin

Thread: Civic Lip Project [56K Warning - Pic Heavy]

Page 2 of 9 FirstFirst 123456 ... LastLast
Showing results 21 to 40 of 161
  1. #21
    what do i need to buy.?

  2. #22
    Censee
    Guest
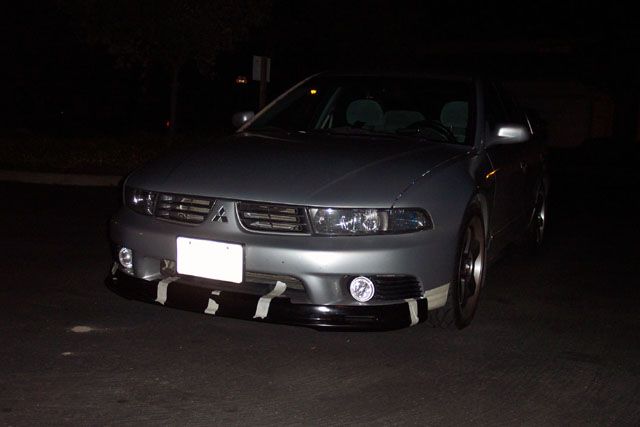
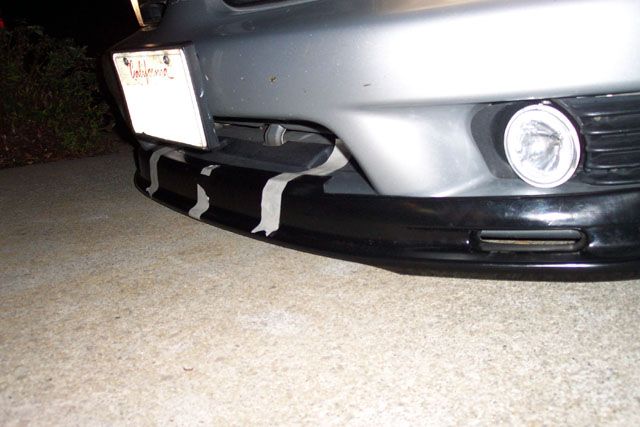
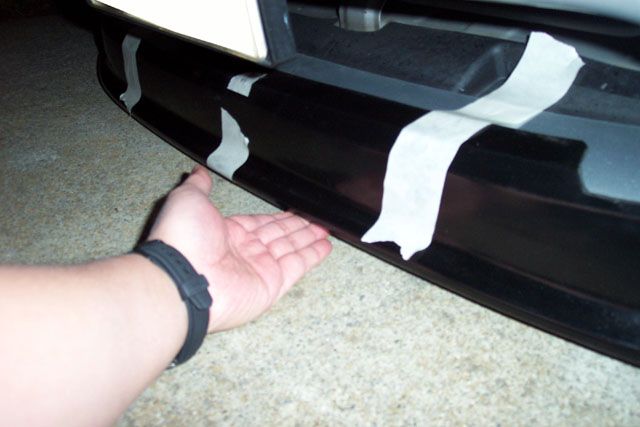
    <div class='quotetop'>QUOTE(Censee)</div><div class='quotemain'><div class='quotetop'>QUOTE(neel9)</div><div class='quotemain'>here is the gap on the sides/// seems not that big of a deal but i just wanna make it look one peice so.//// please help..
    </div>
    do waht i just posted</div>
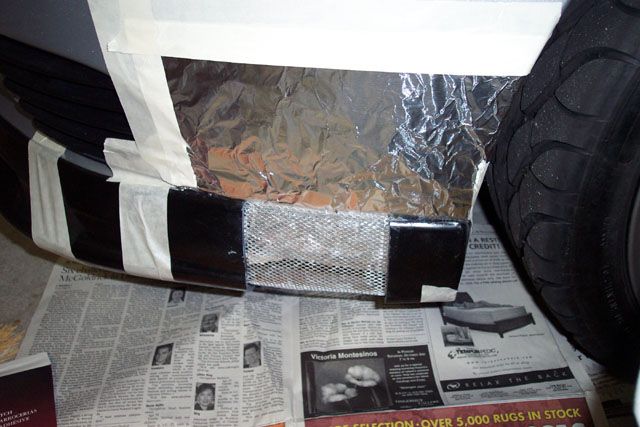
    and actually u might wanna do what he did as well....cut the lip and put the already made edge at the edge,,,since its easier to fill in the middle part than to make an entirely new edge.......u need some fiberglass mat,,,fiberglass resin,,,,sandpaper...and maybe a sanding machine if u can find one.....try and stay away from bondo btw...........fill in with fiberglass,,sand down till u get the proper shape.......keep sanding till u think its almost perfect,,,,then if u have any imperfection on pinholes,,use just resin to give it the final layer on top,,then prime ,wetsand,and thats it

  3. #23
    keep it black.
    myspace.com/xxxJ3ffReYxxx
    TEAM TGCLV
    TEAM DOWNFORCE
    LVEVO.org

  4. #24
    Experienced TGC Member Kalamidad's Avatar
    Join Date
    11-24-2002
    Location
    Originally TGCNY, Now TGCTX
    Posts
    1,781
    NEEL, CAN YOU PLEASE TAKE A LIST OF THE ENTIRE BUMPER WITH THE LIP ON IT SO I CAN POST IT ON THE LIST...
    -Pedro

  5. #25
    TGC Regular
    Join Date
    04-10-2004
    Location
    Brooklyn, NY
    Posts
    704
    I always wanted a lip on my car. If this thing works out, then maybe I'll do what you guys are doing. What year civic does that lip fit on?

    This will definatly be my next project.


    _______________________________________
    "Sey dem a Gangsta, an dem gal a run dem head, tell dem when fi touch de street, and when fi goto bed"

  6. #26
    Experienced TGC Member Kalamidad's Avatar
    Join Date
    11-24-2002
    Location
    Originally TGCNY, Now TGCTX
    Posts
    1,781
    -Pedro

  7. #27
    <div class='quotetop'>QUOTE(Kalamidad)</div><div class='quotemain'>NEEL, CAN YOU PLEASE TAKE A LIST OF THE ENTIRE BUMPER WITH THE LIP ON IT SO I CAN POST IT ON THE LIST...</div>

    dude what u talking about?.. list of my bumper??..

  8. #28
    Experienced TGC Member DryBear's Avatar
    Join Date
    11-05-2003
    Location
    San Francisco Bay Area
    Posts
    1,517
    <div class='quotetop'>QUOTE(neel9)</div><div class='quotemain'><div class='quotetop'>QUOTE(Kalamidad)</div><div class='quotemain'>NEEL, CAN YOU PLEASE TAKE A LIST OF THE ENTIRE BUMPER WITH THE LIP ON IT SO I CAN POST IT ON THE LIST...</div>

    dude what u talking about?.. list of my bumper??..</div>

    What he is saying is to post a full pic of the bumper from far away so we can get an idea of how it fits.

    More updated pics:


    Yikes! Barely clears my driveway:


    Prepping for fiberglassing the gap:


    Got the first layer of fiberglass on, and is drying right now, hopefully it will be finished by the end of this week.

    For reference, here is a good basic tutorial on working with fiberglass:
    http://web.njit.edu/~cas1383/proj/main/

  9. #29
    hey so what do i need to extend my bumper..?? materials? and where .. walmart?

  10. #30
    hey ok.. as i see in the pics.. u have a bonda under the lip... right? and what is the black piece on the right??
    does the bond go outer part of the lip or the inner? and what do i just place fibergalss over the bonda... meaning the extra piece which i need to attach to the lip?..please help..

  11. #31
    Experienced TGC Member DryBear's Avatar
    Join Date
    11-05-2003
    Location
    San Francisco Bay Area
    Posts
    1,517
    <div class='quotetop'>QUOTE(neel9)</div><div class='quotemain'>hey ok.. as i see in the pics.. u have a bonda under the lip... right? and what is the black piece on the right??</div>

    Just to clarify - Bondo is a brand, that has many products from body filler to fiberglass/resin, etc.

    What I have there is a body filler patch - its basically a piece of metal mesh that is there for support. I also had covered part of the bumper with a layer of masking tape and aluminum foil, to keep the fiberglass and resin from sticking to the stock bumper.

    I had cut about 3 inches from the ends of the lip - that is the black piece on the right.

    <div class='quotetop'>QUOTE</div><div class='quotemain'>does the bond go outer part of the lip or the inner? and what do i just place fibergalss over the bonda... meaning the extra piece which i need to attach to the lip?..please help..</div>

    The body filler patch is under the lip, but in all honesty it would be easier if it was on the outside. I then put fiberglass+resin on top of that. I'll probably put a few more layers both on the outside and inside for extra strength.

    Once the fiberglass has set, I will use body filler on top of that to smooth everything out.

    I'll post more pictures of my progress.

  12. #32
    Censee
    Guest
    good work bro,,,looks like u know what u are doing,,,,cant wait to see the finished product,,now neel u sound like u are straight up lost lol......i suggest practicing a couple of times. before u start on ure own car...

  13. #33
    ok thankx.. guys.. so bonda could be found at what walmart ?

  14. #34
    Censee
    Guest
    Quote Originally Posted by neel9
    ok thankx.. guys.. so bonda could be found at what walmart ?
    its called BONDO....bondo is a brand,,,,it makes fiberglass,resin,body filler,,,etc....i reffer to bondo as just the filler cuz i just call fiberglass fiberglass,,,,theres alot of bondo products at home depot,,,actualkly everything u need u can get from there..

  15. #35
    ok so i should get fiberglass and resin right and some net for support?

  16. #36
    the mesh is totally unnecessary for support. a good fiberglass job should be plenty strong. it just give a place to build the fiberglass off of. another way of doing it without the mesh is to cover the gap in the front with a layer or two of fiberglass and then start build up the fiberglass layers from the back.

    Webhosting for less than $3 a month? put "pinoyesv6" as a promo code.

  17. #37
    Experienced TGC Member DryBear's Avatar
    Join Date
    11-05-2003
    Location
    San Francisco Bay Area
    Posts
    1,517
    Quote Originally Posted by pinoyesv6
    the mesh is totally unnecessary for support. a good fiberglass job should be plenty strong. it just give a place to build the fiberglass off of. another way of doing it without the mesh is to cover the gap in the front with a layer or two of fiberglass and then start build up the fiberglass layers from the back.
    To be honest, I have to agree here - the mesh was a bit more of a pain in the ass to work with than expected.

  18. #38
    Censee
    Guest
    Quote Originally Posted by wanderingpinoy
    Quote Originally Posted by pinoyesv6
    the mesh is totally unnecessary for support. a good fiberglass job should be plenty strong. it just give a place to build the fiberglass off of. another way of doing it without the mesh is to cover the gap in the front with a layer or two of fiberglass and then start build up the fiberglass layers from the back.
    To be honest, I have to agree here - the mesh was a bit more of a pain in the ass to work with than expected.
    yea i beilieve the resin would just seep through.......

  19. #39
    ok so... i do is lay fiberglass and than resin right? i took a plastic and shaped to according to what i wanted

  20. #40
    You are here entirely tooo much!! seth98esT's Avatar
    Join Date
    08-01-2002
    Location
    Keokuk, IA
    Posts
    8,348
    Should have just used the fiberglass cloth sheets. The cloth just absorbs the resin
    7g for life!

Page 2 of 9 FirstFirst 123456 ... LastLast

Posting Rules

  • You may not post new threads
  • You may not post replies
  • You may not post attachments
  • You may not edit your posts
  •