The Galant Center - Powered by vBulletin

Thread: Installing "M3 Mirrors" tutorial

Showing results 1 to 11 of 11
  1. #1

    Installing "M3 Mirrors" tutorial

    <span style='color:red'>DISCLAIMER: I am not responsible for any damage to either you or your car.This was done on a 02 Galant with a pair of M3 mirrors from a 94-97 Accord.</span>

    Parts:
    - comes with m3 mirrors
    - bracket (needs modification)
    - extension wires for the LED (not long enough)

    Need:
    - 7 feet of extension wires from home depot (as thin as the original) black and red
    - Rotary tool (not required, but will make things a lot easier)
    - (6) 1 inch screws w/ washers ( worked good for me)
    - soldier iron w/soldier
    - electric tape
    - wire hanger

    Step 1:
    - go to the G take the door panels off you’ll see the connecter witch leads to the mirror looks like this:

    - take them apart and cut off the connector (the one that’s on the mirror, should be in your left hand) leaving 3 inches of wire.
    - Next your going to have to solder the wires together on the accord there is a yellow, green and white. On the gallant there is yellow, green and blue
    Here’s a diagram on how the wiring work:
    http://img172.imageshack.us/img172/1449/wiring1sp.jpg
    - once you got them soldiered go back to the car and make sure they work (don't install them just let it sit on your lap and make sure it moves right)
    - take it back out and tape up your connections with wire tape

    Step 2:- pick what color you want the LED to light (mine came with white or blue)
    - then you will have to soldier the extension wires it came with, I connected the white and the black(ground)
    - take the 7 feet of wire you bought and cut it in half ( should have 4 wires)
    - next you take the extension wires from home depot and soldier those together


    Step 3:
    - Take the triangle bracket it came with and a drill, your going to drill through the part where the screws are going to go in (don’t worry the mirrors will cover them up) this will make finding the holes on the car easier.
    - Place your bracket on the car to where you want it to sit then drill your holes with the bracket still in hand
    - Your going to notice that the socket for the screws are too long and is going to cause a gap
    - Use a rotary tool to cut/sand it down proceed until gap is gone but your not done yet you’ll notice that when you hold the mirrors to the car they will sit at an angle. So grab that rotary tool and cut/sand down the 2 lower sockets but not to much, this wont eliminate the angle completely but reduce it
    - put your mirrors on and check if you like how they sit if the angle is till bad then sand it down a bit. Remember not to short or your screws wont reach or you’ll cause a gap on top.


    Step 4:- if you want a clean set up your going to have to make a cut here:

    - this is located inside the door. If you open the door you’ll see a rubber tube that leads from the door to the fender make a slit there too.
    - Then take the black and red wire for the LED tape it to a hanger wire and fish it to the first slit in the inside the door
    - Then fish it again through the tube
    - Take the wires through the 2nd slit before you put it in to the fender
    - Jack up the car
    - Take the wheel off
    - Take the fender guard off
    - Then go back to the wire and fish it toward the turn signal bulb
    - There should be a hole with other wires coming out of it pull the LED wires through there as well
    - Remove the turn signal harness from its socket
    - Splice the black wire (don’t cut it, just leave some wire bare)
    - Soldier the ground and tape it up
    - Now if you want them to blink when you turn then tap it to the thicker green wire should look like this:

    - Check if they blink
    - Soldier and tape it up
    - Put your door panels back on and your done!!!
    [size=9]<span style='color:blue'>special thanx to pinoyesv6</span>
    R.I.P. My fellow Galant owner. May God be with you and your family.


  2. #2
    great tutorial i did mine the same way... but only thing i Highlyyy say you guys strip the wire a little farther down then this pic below, incase u accadently snip it...And make sure the mirrors are POWER, or its useless..their bout 40-48$ shipped now and days on ebay...hope u dont mind bro i added some info n pics

    [/img]

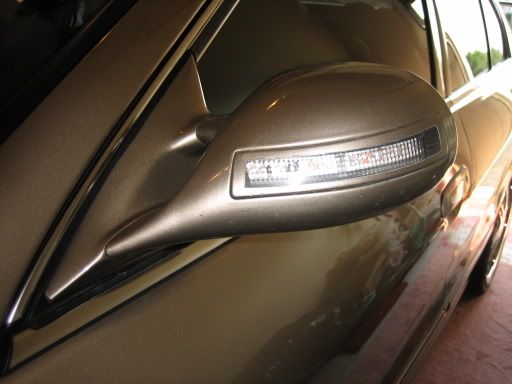
    heres a closer pic of the fitment incase u guys are wondering..


    00 Galant ES Turbo/5-Speed
    13 GTR

  3. #3
    actually, don't strip the wire, wiretaps are only a few cents and offer a better look and there is no damage to the stock wiring...

  4. #4
    actually soldering the connection is better than the taps. you get a better connection plus a good solder connection won't fail as quick as a connection using a tap. trust me on this one, been there, done that.

    Webhosting for less than $3 a month? put "pinoyesv6" as a promo code.

  5. #5
    i don't like the mirrior it came with (cheap) is there a place on line where i can buy a better mirrior for the M3...
    R.I.P. My fellow Galant owner. May God be with you and your family.


  6. #6
    Member
    Join Date
    03-07-2006
    Location
    Virginia (If I showed you where I live, you would think I was hiding)
    Posts
    110
    My M3 mirrors are kind of shitty too. It seems like it has a littlle bit of a curve on the mirror itself.

    To Be Missed....... Otto Racing WAI, K&N Air Filter, Otto Racing Performance Muffler, Header, GReddy Voltage Stabilizer, Strut Bar, APC Aluminum Shifter, Painted Calipers, M3 Mirrors, Optix Headlight Strobes, Audiovox 7.5" DVD Player/Monitor, JVC SD11 Headunit, Pioneer Premier 6x9s, Pioneer Premier 6 1/2s, 12' Rockford Fosgate Punch HX, Lanzar 1200W Amp.

  7. #7
    New Member
    Join Date
    10-19-2005
    Location
    princeton, ma.
    Posts
    50
    my m3 mirrors came with red.white,black wires for the power so what wire is what does anybody know and my led has white ,blue,black wires do i just hook up the blue for blue led and black for ground

  8. #8
    Experienced TGC Member o1naturalhigh's Avatar
    Join Date
    07-23-2004
    Location
    San Diego, CA
    Posts
    1,496
    i'm bout to use this tutorial...

    oh...and btw...mines came with a white, green, and yellow wires (just like on our stock mirrors)...so i got lucky?? i didn't get the led one's...i'd rather keep the least lights on the car as possible...

    hey FBI...what kind u get? the gen 2 m3 mirrors??

  9. #9
    <div class='quotetop'>QUOTE(o1naturalhigh)</div><div class='quotemain'>i'm bout to use this tutorial...

    oh...and btw...mines came with a white, green, and yellow wires (just like on our stock mirrors)...so i got lucky?? Â*i didn't get the led one's...i'd rather keep the least lights on the car as possible...

    hey FBI...what kind u get? the gen 2 m3 mirrors??</div> to be honest i don't even remember when gen it was...
    R.I.P. My fellow Galant owner. May God be with you and your family.


  10. #10
    what style exactly do we need for this to be done the same as pix? there are many types of mirrors available with 94-97 accord m3
    King 8G <Street Stylez Kennesaw Prez>


    JDM HEADLIGHTS, TGC FRONT BUMPER, CRUX 2 SKIRTS/REAR LIP, CF ALTEZZA TAILLIGHTS, 19INCH RIMS, CF EVO HOOD, 3INCH EXHAUST, AND A CRAZY ASS PAINT JOB I GOT FOR FREE!

  11. #11
    anybody what kind are they?
    King 8G <Street Stylez Kennesaw Prez>


    JDM HEADLIGHTS, TGC FRONT BUMPER, CRUX 2 SKIRTS/REAR LIP, CF ALTEZZA TAILLIGHTS, 19INCH RIMS, CF EVO HOOD, 3INCH EXHAUST, AND A CRAZY ASS PAINT JOB I GOT FOR FREE!

Posting Rules

  • You may not post new threads
  • You may not post replies
  • You may not post attachments
  • You may not edit your posts
  •