The Galant Center - Powered by vBulletin

Thread: jdm headlight install

Showing results 1 to 20 of 20
  1. #1
    rolling
    Guest
    ok so im installing my jdm head light i have 2 Q 1.now the relay that go's to the heads is that 1per head and how do i wire it up. so i'm going to run all the wire from the car to the heads and then split that with the relay or am i going to keep all the wires and not split them and just tap in to with the relay i guess what i'm trying to say is keep all wire from car to heads and the wires from relay to those wires
    shit i guess i dont know what i want to say but if u know what i'm talking about u know what i mean
    q2.what are the lil light bulbs in side the head for and how do u wire that 1 up
    well i leave u guys to this 1 i have to go to the junk yard and find parts for 1 of my heads i need the plug that go's to the h1 bulb not the wires i got those but the lil peace that go's from the wires then the peace and then the bulb and the lil metal peaces that holds the light bulbs in

  2. #2
    Senior Moderator mrjaydeeone's Avatar
    Join Date
    07-31-2002
    Location
    Woodbridge NJ/Staten Island NY
    Posts
    4,455
    okay let me try a stab at this
    My JDM heads didn't have any relays. Basically you just have to split the stock wires to be able to run to the high and low beams of the JDMs
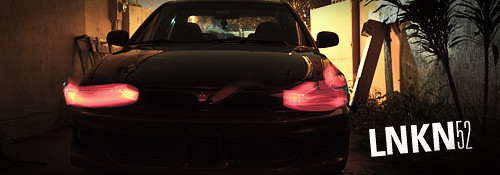
    as far as the little bulb that's a ba9s, that's for the city light. Those are connected to the constant of the parking lights, and come on when the parking lights are turned on you can see mine here
    That's all I can really help ya with bud
    Jason - - cofounder of TGCNY
    click banner to enter the NY Chapter

    2001 Galant ES
    2004 Jeep Grand Cherokee Special Edition

  3. #3
    rolling
    Guest
    i was talking about the relay so that the low beams and the high beams stay on togther
    oh thats what the lil bulbs thats what thoght thanks

  4. #4
    Senior Moderator mrjaydeeone's Avatar
    Join Date
    07-31-2002
    Location
    Woodbridge NJ/Staten Island NY
    Posts
    4,455
    ooo oo that relay. Yeah mine are hooked up that way. Goosey2099 did mine and his. He wrote up a tutorial in the 8g customizing section I believe it is. I am no good with relays.

    here is that tutorial
    Jason - - cofounder of TGCNY
    click banner to enter the NY Chapter

    2001 Galant ES
    2004 Jeep Grand Cherokee Special Edition

  5. #5
    rolling
    Guest
    i was useing the tut relax wrote he is useing the spdt relay and it looks diffrent then the 1 u got

  6. #6
    Quote Originally Posted by rolling
    ok so im installing my jdm head light i have 2 Q 1.now the relay that go's to the heads is that 1per head and how do i wire it up. so i'm going to run all the wire from the car to the heads and then split that with the relay or am i going to keep all the wires and not split them and just tap in to with the relay i guess what i'm trying to say is keep all wire from car to heads and the wires from relay to those wires
    shit i guess i dont know what i want to say but if u know what i'm talking about u know what i mean
    q2.what are the lil light bulbs in side the head for and how do u wire that 1 up
    well i leave u guys to this 1 i have to go to the junk yard and find parts for 1 of my heads i need the plug that go's to the h1 bulb not the wires i got those but the lil peace that go's from the wires then the peace and then the bulb and the lil metal peaces that holds the light bulbs in


    umm, the relay ur talking about is to keep the low beams on when u activate your high beams right (what i used a diode for in my wiring)? GOOSEY2099's JDM headlight wiring should work for both halogen and HID setups where mine was formulated for adding on to a full HID relay network (i have a custom network replacing the stock wiring and drawing power from the battery directly - overkill). there is a tiny error in his write up tho... you want a Single Pole Double Throw relay (SPDT), not a Single Pole Single Throw (SPST) relay. basically what is hapening is that when u have the low beam on, the positive 12v+ is going throught he relay to the low bulb from the normally closed (87a) to the common terminal (30) on the relay. now when u hit ur high beam, the coil on the relay will be activated sending 12v+ to the low bulb through normally open (87) to the common (30). the high beam wire needs to be split to both activate the relay (wire the one of these hi beam wires to 85 or 86) AND to power the hi beam. in this scheme u will need to run a seperate ground wire to (85 or 86 whichever u didn't use for the hi beam input), and then a fused (30 amp) positive wire directly to the battery positive terminal to normally open (87). i used a diode (yup only 1 on the entire network) because my headlights are allready running through relays and are drawing much less current over the diode itself from the OE wiring which simply activates the relays that then send power to my lights directly from battery. wow that was alot of writing, i need a drink... i hope that makes it clearer... hit me or GOOSEY2099 up for more help but that should be the crux of it. good luck bro!

    o yeah the small bulbs are city lights, some JDM's have them, some don't; mine don't. you can wire those to the parking lights or a seperate switch or whatever u want depending on when u want them to be on.

    edit: i just read my tutorial again using relays... mine is a little different than GOOSEY2099's but they both should work... just another way of doing it, mine just bridges the hi to low to power the low from the hi input when the hi goes on via the relay. im my scheme, the positive OE low goes directly to the bulb, the postive OE hi also goes directly to the bulb; then the relay sits in the middle as a one way bridge from hi to low (which is OK since the OE low is open when the OE hi is activated). GOOSEY2099's takes the OE low and goes into the relay then to the low bulb, then the OE hi splits to send power to the hi directly and the low via the relay.

    wow... i really need a drink now! that was alot of writing for something that is so simple!

  7. #7
    rolling
    Guest
    thanks reelax and jaydee i'm going to do this in the mornning
    hey reelax when ever u want to get some coronas or what ever u drink i'm out here in the valley hommie

  8. #8
    Quote Originally Posted by rolling
    thanks reelax and jaydee i'm going to do this in the mornning
    hey reelax when ever u want to get some coronas or what ever u drink i'm out here in the valley hommie
    how did it turn out?

  9. #9
    rolling
    Guest
    man this is turning out to be a pain in the a@# i'm trying to put them with out cut the car

  10. #10
    Quote Originally Posted by rolling
    man this is turning out to be a pain in the a@# i'm trying to put them with out cut the car
    they'll never sit flush that way... sorry to say it, you gotta cut both the car and the lights for these to go in flush. it took me 9 hours of trial and error since i was like the second to do it and nobody had a tutorial... and the 1st guy to do it never posted.

  11. #11
    rolling
    Guest
    well i got them setting pretty good just that the passenger side i had to trim off the plastic peace of the low beam off a little bit because the tran cooling fluid line got in the way

  12. #12
    Quote Originally Posted by rolling
    well i got them setting pretty good just that the passenger side i had to trim off the plastic peace of the low beam off a little bit because the tran cooling fluid line got in the way
    did u bend the radiator rails? that's key to getting them in flush.

  13. #13
    rolling
    Guest
    no i havent bend nothing yet lol

  14. #14
    rolling
    Guest
    and now the progress but first the teaser pic

    ok here we go

    more pics to come

  15. #15
    rolling
    Guest
    and heres how i did it because i didnt want to cut the metal from the car so i cut the head lights

    and this is the driver side much cleaner

  16. #16
    Quote Originally Posted by rolling
    and heres how i did it because i didnt want to cut the metal from the car so i cut the head lights
    wow ur install looks good! but u gotta find a way to seal those holes up now... condensation will ruin the look of ur new lights. try that leak sealing metal tape they have at the autoparts store that has adhesive on one side and metal on the other covered by electrilcal tape...

    again good job!

  17. #17
    looking good!
    Accident. Deemed Unfixable. Got a check for it.

  18. #18
    rolling
    Guest
    oh i already did it just that it was getting late


  19. #19
    TGC Regular
    Join Date
    04-07-2006
    Location
    Hialeah, Fl
    Posts
    594
    awesome...its seems that TGC is doing its job, car looking even cleaner

  20. #20
    Experienced TGC Member
    Join Date
    04-13-2005
    Location
    Schaumburg, IL
    Posts
    1,455
    Quote Originally Posted by Reelax
    wow ur install looks good! but u gotta find a way to seal those holes up now... condensation will ruin the look of ur new lights. try that leak sealing metal tape they have at the autoparts store that has adhesive on one side and metal on the other covered by electrilcal tape...

    again good job!

    ya i hate condensation i had that problem with my halos but its fixed now. so i just drill two little holes on each heads and no condensation

Posting Rules

  • You may not post new threads
  • You may not post replies
  • You may not post attachments
  • You may not edit your posts
  •