 Log in
 Register


 Reply With Quote
should put a disclaimer saying your not responsible for damage anyone else does to their G
btw nice tutorial


Not sure whether it has been posted on here before, but sure enough would help to those who does not want to send their G to the bodyhop to fit the bodykit and are rather do it by themselfes.
Ill start of the rear bamper, and as i progress more ill post more info on here, did not do everething at once due to weather conditions.
#1:
When you will open your boot, carefully remove all of the material that stands on your way, it is the spear wheel cover, material that goes over your tail lights( usually held by plastic screws), also plastic bit that goes over your locking ring.
#2
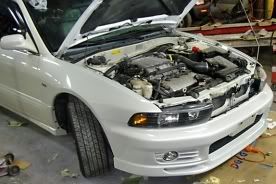
Remove your taillights to have more access to the stock bamper.
#3 On either side of the boot, right in the corner you will see some screws there are going to be 3 of them on either side, they will need to be removed as well.
and some on the left side
#4 After you remove the plastic bit, you will see that there are 8 more long bolts are holding he bamper, but 4 of them on far side are actually holing little metal rails that support the bamper by plastic clips, they will have to be removed as well otherwise the bamper will not fit properly.
#5 as i have pulled away the bamper after removing all the bolts and nuts holding it, i noticed that bamper is held by 2 more little bolts underneath. Depending on the age of the car if the bolts are a bit rusty, they must be oiled up a bit in order for you not to brake the head ofthe bold while trying to unscrew it.
#6
After you will remove your bamper it will look something like this
As you can see the little rails just under the taillights due to me not knowing that they must be removed, which should have been done while dissasembling the bamper.
#7
After you have removed the bamper make sure you will also unscrew the little protectors that are held by 3 screws and are located on either side of the car by the rear wheels, as bumper should go over this area, and the screws will be used later to hold it to the same plase using same holes that screws were screwd in to.You will only have to drill some holes in the bamper to match those with the holes in the fender.
#8
Your bodykit bamper has 4 bolts coming out the middle of it, those bolts must go in to the holes where the bolts of the standard bamper used to go in to. If the holes do not match to the bolts location, you must predrill new holes or extend the existing once in order for the bodykit to fit properly
#9
When you will fit the bamper, first thing you must do is to put back the tail lights to ensure that bamper is leveled up. Then you may drill the holes on the bamper to match those where little protectors used to be held, and that would require 2 holes on either side of the bodykit, as you have seen in previous pics.
#10
Next you will notsice that the bamper is not leveld up by where the tail lights meet it, as the bamper would stick out by 5 mil. In order to fix ithis, you will have to ask for a helping hand in order to push in the bamper to close the gap, while you will drill 2 holes on wither side of the boot where standard bolts used to hold the bamper. By placing a couple of small bolts you will fix the problem of gaps on each side
That concludes my tutorial, hope that some of you guys may find it usefull, howevef i do nate take any responsobility if any of you will brake something during this time consuming process.And if you have any questions im more then happy to unswer them.
Once the weather will allow me to dosome work, i will post a tutorial on side skirts installation. 8) 8) 8)


should put a disclaimer saying your not responsible for damage anyone else does to their G
btw nice tutorial

How do you do the front bumper???

Nice Tut!
nice one
Not how fast your car goes but how good u drive going fast.
Drive It Like You Stole It!
7G Erubini Body Kit for sale
http://thegalantcenter.net/forum/viewtopic.php?t=57678
well, for him all he has to do is take his stock bumper off and replace it with another. why so simple, you ask? maybe he has a world spec I guessOriginally Posted by KaziKai

I dont know if I would want to remove welded brackets that hold my stock bumper just to install a body kit. That to me means that If I ever want to go back to my original bumper, I have to spend more money to weld those tabs back, under the tails. No thanx. I will just go the JDM route. Body kits dont fit verywell anyway and are wayyy to sensitive to impacts. Good tutorial though.
Well I was hoping for a better answer then that.... I am new to all this upgrading to my G.... and I cant seem to figure out how to pull off the front bumper.. I was reading around the forum.. and some people said that you have to cut a bit of the crash bar and some said you dont have to. Now I am confused! I dont know where I can find a place to do my bumper without costing me an arm and leg... ($280 Just the FRONT BUMPER) Anyone in Vegas want to help me? or guide me? or show me where it would be cheaper?
THANKS
Buy a service manual, it tells you step by step how to do anything you need!
Thats how I started, just taking shit apart and putting it back together.
ok. I will do that. what kind of tools do I need? and screws... and is there a special way to drill thru fiberglass?


nice how to
nice bro.. - But damn...my Back bumper didn't fit for SH#%!.. I think it was made out of a bad mold or something..
yeah maybe it did have a bad mould, where exactly was it not fitting properly???
HAHA! Your not alone! I cant fit my rear cyber 2 for shit too... I got mine from Extreme Diamentions.... and they SUCK! I have another one now from VIS and I hope it fits... I will be working on it tmr morning.... Will post picture of it when I am done...
if you want to see the ED cyber 2 go to my website www.kamikazikai.com

great tutorial!

i agree 100%....ure suppose to bolt the top lip of the bumper to those small welded brackets for support... at least ive seen this done on all galant rear aftermarket bumpers ive seen installed..and when u put the bumper on those welded pieces, they sit perfectly aligned to hold the bumper in place..NZgalant, were yours in the way of the bumper fitting properly?
Last edited by Censee; 10-11-2008 at 02:09 PM
cool tutorial


 2001 Mitsubishi Galant LS
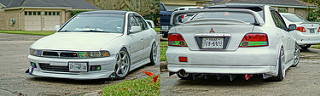


Bookmarks