The Galant Center - Powered by vBulletin

Thread: my low budget projector headlight project....

Page 2 of 6 FirstFirst 123456 LastLast
Showing results 21 to 40 of 101
  1. #21
    Experienced TGC Member Dominicano's Avatar
    Join Date
    07-31-2002
    Location
    Fort Worth, TX
    Posts
    1,418
    Quote Originally Posted by guynlidia2006 View Post
    that is the cut off plate.... i can put it in befor the projector... but i dont like how it looks... i love the way it looks now... i can point them downward since it will be adjustable,,,, i honestly dont care about the cut off point... and i put it in place of my headlight to check it out and it is much brighter than stock and looks really clean... they cylinder above actually makes it too dim... so i took them out... i do realize i am not gonna have all the beneficts of projectors , but thats ok... thats why its projectors on a budjet...

    you might not care about the cut off but the incomming traffic will, just hope its not a cop who gets a blinding from your lights.


  2. #22
    u really don't understand how projectors work. here:


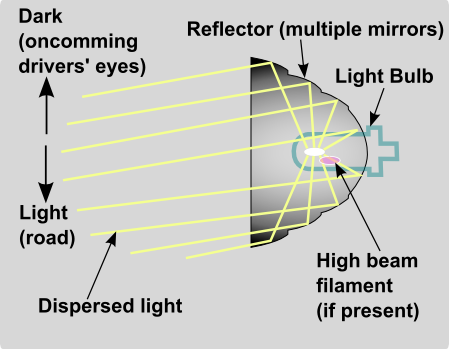
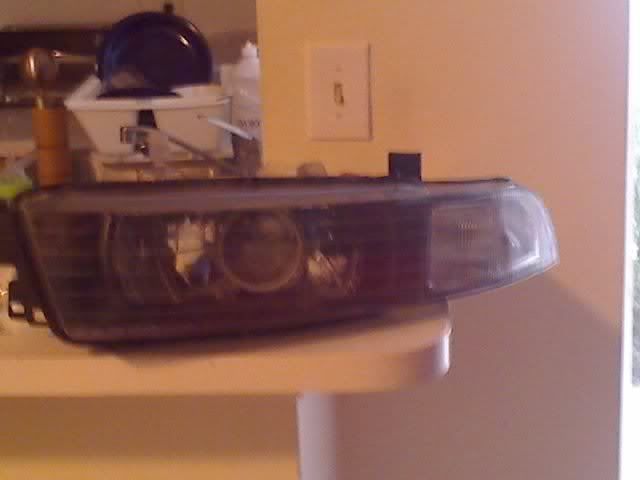
    see how the light path flips vertically in the projector... this is caused by the specially shaped reflector section that it comes with. also the blub has to be in the EXACT correct location for this all to work... move it an inch off in relation to the reflector and/or from the lens, and the focus is thrown completely off. notice that the cuttoff shield is at the bottom but the light it cuts off is going towards the top... this shields lights from blinding others on the road especially oncoming traffic or people you are following. putting this sheld in front of the lens would be useless as the light does not converge near that point.

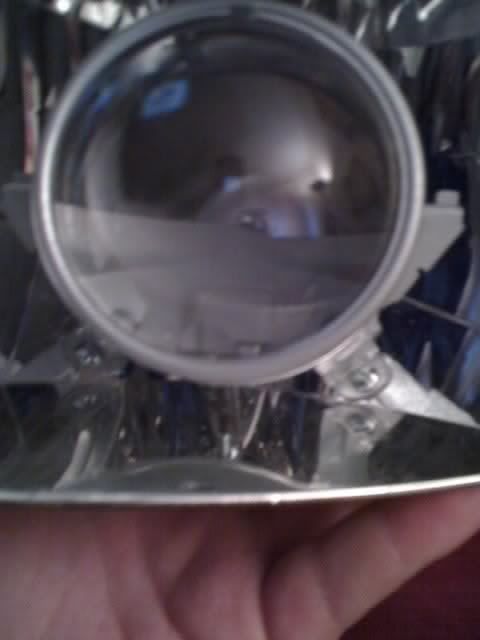
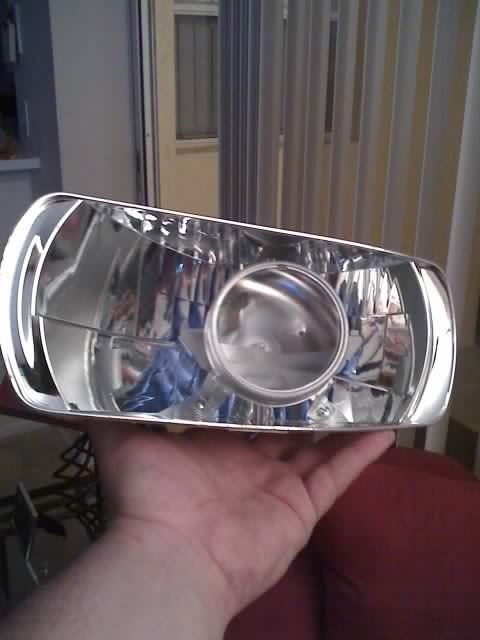
    notice that in the reflector headlight, like what we have stock, the light paths are NOT flipped by the reflector. as siad before, you are basically just putting a magnifying lens int front of the OE headlight. did you notice that there is actually a shield in that location on the OEM headlight so that all light coming out of the front of the headlight is being reflected from the back and sides of the reflector (you should not be able to see the bulb directly from in front)? removing this shield and magnifying the section of beam hotspot createdit, then adding a cylinder (projector shroud) to limit light leak to the sides of the reflector bowl (which is where more than 50% of the light thrown onto the road is coming from), will effectively undermind all the engineering that went into making your headlight throw light down the road; you will now have possibly the WORST visibility possible other than not having headlights at all... it may look bright when facing your car but it will have extremely dissapointing coverage and beam pattern when looking from behind the wheel.

    in a projector, the light source, lens, ellipsoidal reflector, and cutoff shield, all have to be in perfect alightment for the light operate correctly, move any of those components and the light loses its function (except for a movable shield in a bi-xenon application). the first anology that comes to mind of using a projector lens with a normal reflector bowl is like mounting a 19" tire on a 18" wheel... no matter how you want it to work, it just won't.

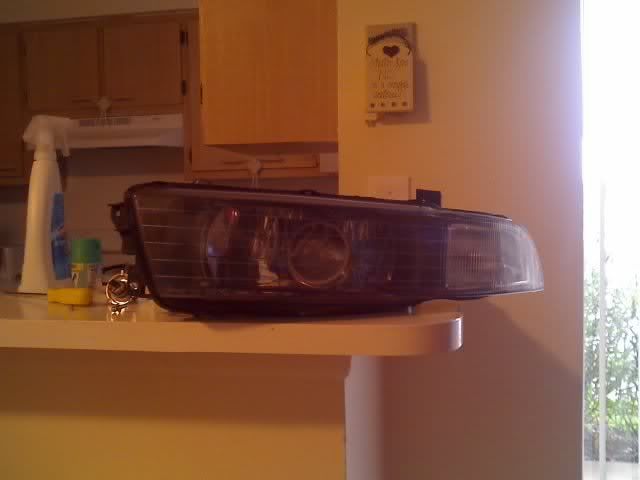
    you have basically done 50%-75% of the work to do a correct projector retrofit. abandon this misguided idea and do it correctly with the entire projector.
    Last edited by Reelax; 06-27-2008 at 11:53 PM

  3. #23
    ok guys i got you.... thanks for the smack in the face... this is what i did(i know i am hard headed)... i put the cutoff plate in the stock reflector between the reflector and the the projector and i hooked it up and i see what your talking about... and thanks for the pics they were helpfull... i am going to stick with the stock reflector but use the cutoff... it gives me the desired results... it is brighter but the cut off looked even with the stock headlight but alot sharper... so once i get them in and adjust them i think u guys wiill be surprised... here are some pics with the cutoff,


    Mods:
    2 tone leather interior, touch screen navigation, 7inch headrest tv's, 17" Driftz Black and Polished rims, 215 50 17 Goodyear Eagle Nct5 tires Tein s lowering springs, kyb gr-2 struts, rearview mirror camera, diamond black paint custom front and lower grill, Chrome door pillars., and chrome door handles. Powder coated my wipper arms wet black, exhaust heat sheild and my valve cover. 2nd gen led taillights

  4. #24
    when turn on i was thinking only half of the projector would glo or light up but the whole thing does and it loooks good..
    Mods:
    2 tone leather interior, touch screen navigation, 7inch headrest tv's, 17" Driftz Black and Polished rims, 215 50 17 Goodyear Eagle Nct5 tires Tein s lowering springs, kyb gr-2 struts, rearview mirror camera, diamond black paint custom front and lower grill, Chrome door pillars., and chrome door handles. Powder coated my wipper arms wet black, exhaust heat sheild and my valve cover. 2nd gen led taillights

  5. #25
    Can't even really tell the cutoff is there anyways...post final pics, I'm interested to see the results.

  6. #26
    You are here entirely tooo much!! 4-G-rim's Avatar
    Join Date
    07-20-2003
    Location
    Orlando, FL
    Posts
    3,169
    Awsome fab work on the budget projectors!! Looking forward to the final finished pics of the lights on the car.

    1991 Galant VR4 1948/2000_________1996 Galant "S" 5 speed 2.4L turbo

  7. #27
    like relax said, you're only a few steps into doing it the RIGHT WAY. Why take short cuts and do it the ghetto way. you just dont use any kind of reflector on a projector. SO many factors come into play; reflector shape, distance of the bulbl from the lens or shield.

    it's not about budget. you got all the major pieces.


    GREEN is the new BLACK

  8. #28
    hope this helps and gives you a few ideas.


    custom aluminum L brackets


    GREEN is the new BLACK

  9. #29
    so now i have the cutoff in both headlights and u cant really tell they are there... what i did was use the piece that the stock bulb is under to reflect the light... i cut off the end and fabed a bracket for the cutoff so it is inbetween the bulb and the projector on the bottom... just like the pics u showed me... thanks for all your help... i will post pics once i get the heads together and all lined up... i know it would of been easier to cut it up and retro it in, but i wanted to keep my factory bulbs... soon i am gonna put hids with hi/lo... i just like to be able to unbolt everything back to stock...
    Mods:
    2 tone leather interior, touch screen navigation, 7inch headrest tv's, 17" Driftz Black and Polished rims, 215 50 17 Goodyear Eagle Nct5 tires Tein s lowering springs, kyb gr-2 struts, rearview mirror camera, diamond black paint custom front and lower grill, Chrome door pillars., and chrome door handles. Powder coated my wipper arms wet black, exhaust heat sheild and my valve cover. 2nd gen led taillights

  10. #30
    wow that looks really nice... but i think it is gonna work out right for what i am looking for... and not everone has the right tools and the know how to do a sick set up like u did... i didnt do it the ghetto way i did it my way, when u look at it in person it looks like it should be that way and i am even using the cut offs... so no one will become blind in the process of me driving... lol
    Mods:
    2 tone leather interior, touch screen navigation, 7inch headrest tv's, 17" Driftz Black and Polished rims, 215 50 17 Goodyear Eagle Nct5 tires Tein s lowering springs, kyb gr-2 struts, rearview mirror camera, diamond black paint custom front and lower grill, Chrome door pillars., and chrome door handles. Powder coated my wipper arms wet black, exhaust heat sheild and my valve cover. 2nd gen led taillights

  11. #31
    the stock reflector will not focus the light through the lens correclty. this will yield horrible beam patterns. i doubt the cutoff shields will do anything since the light path is not being flipped by the ellipsoidal reflector (the projector reflector). all this work will be for nothing once you see how they shine on the road, or worse yet, you hit something you didn't see at night becasue you made your headlights useless. there is a reason nobody does this "your" way... it simply does not work. and really you are so close to doing it right... why do you want to retain your stock bulbs? H4 sucks. speaking of H4... u know that your gonna lose your hi beams if the cuttoff shield does it's job and actually creates a cutoff (but it wont because your reflector will not focus the beam correctly anyways). in a bi-xenon projector (hi/lo projector), the shield itself moves to change beam pattern... there is no secondary filament to activate a hi beam (and even if there was it wouldnt do anything unless the cutoff shiled moved as well). seriously just do it the right way like ASTIG. if you want to go back to stock later, just get new stock headlights.

    this is all great fun for you to learn what alot of us allready know, but you want to do it your way and find out for yourself. we're just trying to save you the effort.

    BTW, ASTIG, looking at your pics i realy want to go and get some TL bi-xenons and throw them into my JDM's...
    Last edited by Reelax; 06-28-2008 at 02:38 AM

  12. #32
    Best of luck with the lights, listen to the advice, they are only trying to help. Post some finished pics when installed in the car.
    OZ Rally Crew #001, Quaife Club member :D

  13. #33
    i hear what u guys are saying... but i test fitted them yesterday and the car and it looks good to me.. they were bright and it was night time and i could see... i hear what u guys are saying... has anyone ever tried the install this wayy or just figured it would not work and did not try it? Funny thing is i usually go against the grain, sometimes it works out, sometimes it dosent... but in the end i am goning to have some nice looking headlights... and from what i could see when test fitted I should be able to see just as well as before maybe even better.... i did notice a cutoff almost even with my hoodline... and from the pics of cutoff i see that looks about normal... i do thank all you guys for your impot... because with out the cut off installed i was deff gonna fail... so now i have a 50/50 chance... :-)
    Mods:
    2 tone leather interior, touch screen navigation, 7inch headrest tv's, 17" Driftz Black and Polished rims, 215 50 17 Goodyear Eagle Nct5 tires Tein s lowering springs, kyb gr-2 struts, rearview mirror camera, diamond black paint custom front and lower grill, Chrome door pillars., and chrome door handles. Powder coated my wipper arms wet black, exhaust heat sheild and my valve cover. 2nd gen led taillights

  14. #34
    Official TGC Pop-Pop Fishboy55's Avatar
    Join Date
    07-31-2002
    Location
    Baltimore, MD
    Posts
    2,848
    You absolutely cannot tell where your beam pattern and cutoff are without a proper headlight alignment grid. Just because it looks nice at night doesn't mean it's aimed properly. You're making a huge mistake by proceeding without listening to what we're telling you. You do not have the proper tools to align a reflector lens. Reelax told you the beam will be distorted and out of alignment if the bulb is an inch off. It's actually more like a quarter of an inch. You will miss the center of the beam being where it needs to be, you've reversed the cutoff by at least 180 degrees and you haven't shielded the ambient light from your stock bulb bouncing off the stock reflector, missing the projector lens altogether and shooting forward.

    So basically, you're still doing what I told you in my first post. You're putting a magnifying glass in front of your headlight. And worst of all you're doing it strictly for the sake of looks with no concern for safety.

    If that's a picture of your kid in your avatar, are you willing to risk his safety by potentially blinding an oncoming driver that could then swerve head-on into your car for the sake of cool looking headlights? Think about the potential consequences of your decision....
    Chip

    2000 Basalt Black Metallic GTZ
    (Paint Code: Porsche LC9Z)

    Genuine experience carries a lot more credibility than the ability to answer a question.


  15. #35
    well i guess the bulb is in the right place... Because the cut off looks pretty good, dont get me wrong it is not crisp.. but it looks good... i got them aimed but i am going to a place i know tommorow night to do it aiming at a wall.. there not too bright , they are just right.. i know i was taking a risk, but it just made sense in my head... i made sure the bumb was in the excat center of the lens and the cut off was blocking about what it was before i took it apart. I know you guys dont agree with me, but if u saw what i saw tonight you would agree... it looks good and the cut off is pretty good, the hi beams dont really work anymore... so i guess the cut off is doing its job... gime me a few mins to post some pics... my camera phone takes crapy night pics so i need to find my digi cam to take some cutoff pics
    Mods:
    2 tone leather interior, touch screen navigation, 7inch headrest tv's, 17" Driftz Black and Polished rims, 215 50 17 Goodyear Eagle Nct5 tires Tein s lowering springs, kyb gr-2 struts, rearview mirror camera, diamond black paint custom front and lower grill, Chrome door pillars., and chrome door handles. Powder coated my wipper arms wet black, exhaust heat sheild and my valve cover. 2nd gen led taillights

  16. #36


    Mods:
    2 tone leather interior, touch screen navigation, 7inch headrest tv's, 17" Driftz Black and Polished rims, 215 50 17 Goodyear Eagle Nct5 tires Tein s lowering springs, kyb gr-2 struts, rearview mirror camera, diamond black paint custom front and lower grill, Chrome door pillars., and chrome door handles. Powder coated my wipper arms wet black, exhaust heat sheild and my valve cover. 2nd gen led taillights

  17. #37
    You are here entirely tooo much!! peanotation's Avatar
    Join Date
    12-17-2002
    Location
    Sherman Oaks, California
    Posts
    4,304
    let's see some light patterns on the road at night
    http://socallifestyle.com/

    1994 Galant GS 5spd

  18. #38
    i will tommorow
    Mods:
    2 tone leather interior, touch screen navigation, 7inch headrest tv's, 17" Driftz Black and Polished rims, 215 50 17 Goodyear Eagle Nct5 tires Tein s lowering springs, kyb gr-2 struts, rearview mirror camera, diamond black paint custom front and lower grill, Chrome door pillars., and chrome door handles. Powder coated my wipper arms wet black, exhaust heat sheild and my valve cover. 2nd gen led taillights

  19. #39
    try to take pics like astig did so we can see the cutoff.

    if you haven't aimed the headlights yet, you can probably take the pics when u do that.

    Webhosting for less than $3 a month? put "pinoyesv6" as a promo code.

  20. #40
    well i aimed them even, cause one was pointed up and one done... but i was using a bush... i am actually very happy with the results... it is excatally what i wanted... and i got to finally clear my corners.. :-)
    Mods:
    2 tone leather interior, touch screen navigation, 7inch headrest tv's, 17" Driftz Black and Polished rims, 215 50 17 Goodyear Eagle Nct5 tires Tein s lowering springs, kyb gr-2 struts, rearview mirror camera, diamond black paint custom front and lower grill, Chrome door pillars., and chrome door handles. Powder coated my wipper arms wet black, exhaust heat sheild and my valve cover. 2nd gen led taillights

Page 2 of 6 FirstFirst 123456 LastLast

Posting Rules

  • You may not post new threads
  • You may not post replies
  • You may not post attachments
  • You may not edit your posts
  •