-
8g Neutral/Switch disassembly
*please read through complete instructions before attempting, if you think you can not do this at any point do not attempt, you are following these instructions at you and your car's own risk.
History: Well I was having transmission fluid from the A/T leaking somewhere. I checked that it was not coolant and it was not oil but it was trans fluid. I wondered how it could get on top though. Thinking it might just be old fluid on a refill I cleaned the area and checked after a few days, it was still there. as part of making sure that the top gasket of the trans pan was not leaking I took apart the neutral/park safety switch and there was trans fluid here, so I just cleaned it and re-torqued all parts, maybe the thread had walked over time. In a few days I will post if the leak persists. until then, here is the tutorial.
Tools: 14mm socket, 10mm socket, 12mm socket, a screw or anything with handle skinny enough to fit in a whole later in tutorial, shop rags and toothbrush to help clean part.
1. Set the car to Neutral on a flat surface of pull your e brake up on a incline (i did this on a incline). roll down driver side window just in case you might get locked out since they key will not release when the car is on neural. car should be in neutral with ignition OFF.
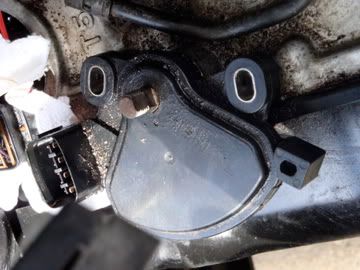
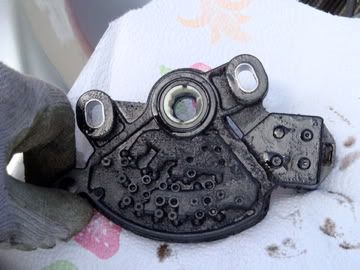
2. go to front driver side of engine bay and on top of A/T you should see something that looks like the picture but with all bolts in place. (if you have aftermarket intake you can do this without taking anything apart, you might have to take stock intake apart otherwise.)
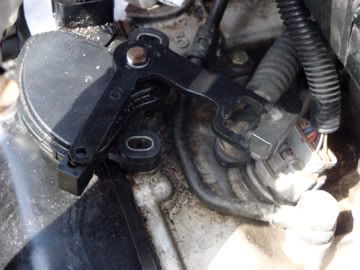
notice there are four bolts/screws to remove. 1 in the middle of the disk 14mm, 2 holding whole assembly down 10mm, and one locking the a metal piece to the shifter in the car (far right in picture) 12mm. (this pic shows them already undone)
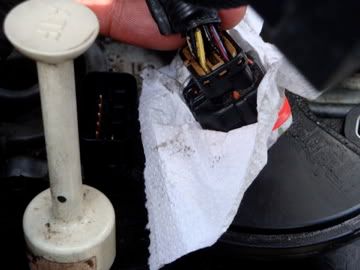
Next, take apart the electrical connector use a Flathead screwdriver to carefully pull it apart, then as I have done find a way to secure it so that no debris can fall in either ends of the sockets.
3. now you want to look at the the disk, there will be a metal part that moves on top of the disk, if the car is in neutral it should be almost perfectly aligned with the whole in the lower disk. use a screw or anything skinny enough to fit through the holes in both. (doing this will keep a reference point for neutral position.)
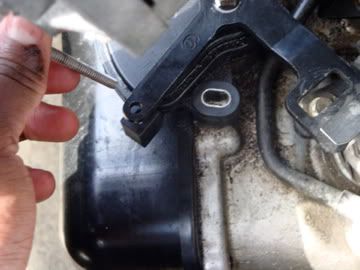
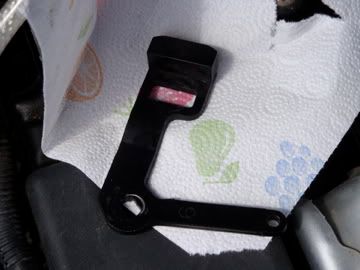
4.Next, take the bolt out of the arm that connects the top metal part to the shifter far right in 1st picture.
NOTE: notice that as you move this your shifter in the car moves. so do this before you remove the two bolts holding the assembly down or everything will move, also do this with the pin through the holes in the metal and disk or that will move around too. here is a pic of the nut.
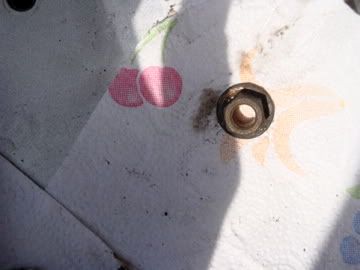
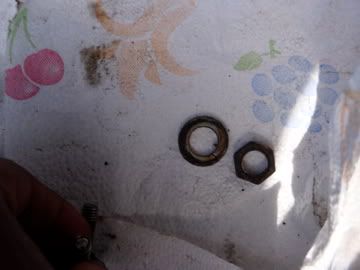
5. After that is out set it to the side ,noting that its a just one nut for that lever, then use the 14mm socket to unbolt the largest bold in the middle of the disk, a nut and a washer should come out. here is a pic of the washer and the nut.
6. now you can slide the metal bracket up and off the shaft the 14mm bolt was on, be careful with everything because the shaft here is not a complete cylinder. just shimmy the metal piece in ALL directions until it come up, here it is alone.
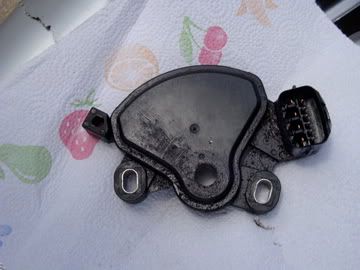
7. Once the metal piece is off all you have to do is take the two mounting bolts off these should be the 10mm ones. NOTE: the disk will still move and click even though other pieces are off so just make sure that when you reinstall the disk that it properly matches up to the mounting bolts. if you need to trace around the disk with marker where the bolts go and align. but it should be obviously cleaner where the bolt was. here are pictures with the all bolts and metal piece out and with the disk completely out.
8. with parts out clean them, I didn't not want to use any solvent or anything cause I'm not sure what disk is made of seems like plastic but dunno. use your toothbrush here too cause bottom has pretty small cervices.
9. Also clean the Mount, once again use towels with no solvent just in case it can leak into the transmission. The disk has a seal built in to it, so I think over time its not as tight, you can also try to source a very small new gasket ring and see if you can fit it for more piece of mind. here are pics of mount and underside of disk.

replace everything in reverse order of how you took it apart. The good thing about torquing down the middle bolt is that it came with the washer so you can break it badly, just use mart judgment i forget the torque specs.
I'm in a college town, I drove around and it stayed clean after two days I'm going to Topeka tom so I will be at highway speeds and I will post whether it stayed clean or not.
* Please Follow directions at your own risk *
please comment and write any typos too thanks.
 Posting Rules
- You may not post new threads
- You may not post replies
- You may not post attachments
- You may not edit your posts
-
Forum Rules


 Log in
 Register
 Reply With Quote
Bookmarks