 Log in
 Register
 . Have to finish sanding it a bit more for the adhesive. its a little flimsy in the middle but when I am not working on it i attached the plastic grill so when I move it I do not put a lot of tension anywhere. Once completed the metal mesh should give it more rigidity.


 Reply With Quote
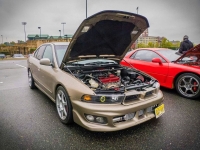 2000 Mitsubishi Galant ES
i do remember ray being the first one to do it
here is mine unfinished as well
i have a hairline crack that i cant get rid of on the very top
thats my first jdm bumper, i have another one installed on the car but left stock


I was the first one to ever do that too, after Stewi..lmao. Few people on the website have the bumper I did, Polishmafia and Ivory_G..Originally Posted by Dominicano

Last edited by RAZ_76; 02-07-2012 at 07:27 AM

i do remember ray being the first one to do it
here is mine unfinished as well
i have a hairline crack that i cant get rid of on the very top
thats my first jdm bumper, i have another one installed on the car but left stock
'00 Mitsubishi Galant ES 4g64T (Samantha)
'01 Mitsubishi Galant ES 4g64 (Daily)
'02 Mitsubishi Galant ES 4g64 (SCRAPPED)
'00 Mitsubishi Galant ES 4g64 (SCRAPPED)
'91 Volvo 740 Turbo B230FT (SOLD)
'88 Mitsubishi Mighty Max (SOLD)
'91 Kawasaki ZX7 (SOLD)
'95 Kawasaki ZX9R

i got a hairline crack on the bottom since I don't have the support there anymore so I added more of the epoxy in the back to make the bottom stiffer and it worked out my crack was right in the middle of the material and the actual bumper after i sanded it down.
I cut out a piece of the stock bumper and used a heat gun to get the right curve on it then used 3m proxy and filler.
'00 Mitsubishi Galant ES 4g64T (Samantha)
'01 Mitsubishi Galant ES 4g64 (Daily)
'02 Mitsubishi Galant ES 4g64 (SCRAPPED)
'00 Mitsubishi Galant ES 4g64 (SCRAPPED)
'91 Volvo 740 Turbo B230FT (SOLD)
'88 Mitsubishi Mighty Max (SOLD)
'91 Kawasaki ZX7 (SOLD)
'95 Kawasaki ZX9R

Well then get to work! LOL!
JDM Zenki Conversion
Lazy hands make for poverty, but diligent hands bring wealth. (Proverbs 10:4 NIV)
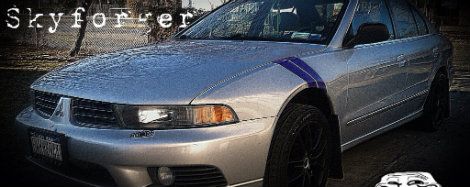
she is complete :-) after months or procrastinating i finally finished it, need to put some mesh on that I got install in on Thursday and she goes to get painted along with the whole car starting Friday also getting that crash in the rear of my car fixed. Going from black to different color.
With installed fogs:
got it as good as possible the body man can deal with the rest :-)
not pretty from the back, i managed to take the grill points where the original screws use to go on and bonded it to the top and bottom so I can use screws to hold the mesh with.

good work!
must see installed.
Looks sooo good! I like it much better than the original!
JDM Zenki Conversion
Lazy hands make for poverty, but diligent hands bring wealth. (Proverbs 10:4 NIV)

Looks great!
Galant E15a EXE/4G63/1987/Ethanol Edition

I really like that! Much cleaner!
But just curious, is the bumper more flimsy without the support in the middle anymore?
-Chris-
2003 Mitsubishi Galant ES 2.4L SOHC: "Octavia"
2005 Honda Accord EX-L Coupe 2.4L DOHC
What kinda epoxy is that?? Something u buy at the paint supply store?? I need that for my bike cuz I have to fix the plastics on it.
Looks good from the back though even though u say it looks messy.
'00 Mitsubishi Galant ES 4g64T (Samantha)
'01 Mitsubishi Galant ES 4g64 (Daily)
'02 Mitsubishi Galant ES 4g64 (SCRAPPED)
'00 Mitsubishi Galant ES 4g64 (SCRAPPED)
'91 Volvo 740 Turbo B230FT (SOLD)
'88 Mitsubishi Mighty Max (SOLD)
'91 Kawasaki ZX7 (SOLD)
'95 Kawasaki ZX9R
its a product called SEM plastic repair 39767 , i still got a full bottle left and the applicator gun for it. But i had to get it this way cause i had a lot of area to fill as I used closed to 3 bottles for this bumper. how big is the problem cause they sell a smaller size like this one http://www.levineautoparts.com/sembure.html if you need more area to fill then you might need a full bottle check that site out they show you the products they have and what product works with what plastic.
when the temp outside is hotter the product is more fluid so when i had done the first part its dripped easily, but once you get that first layer let it get hard then added the big layer. but during the first layer i had to smear it on the screen it dripped lol most of it on the cardboard i had on the floor lol.
Last edited by Dominicano; 03-07-2012 at 08:26 AM
its more rigid now considering i put more of the epoxy in the back since there was a plastic strip left after i removed the parts I did not need. the bottom was a little more challenging cause if you never notice the middle piece of plastic between the pillars is actually lower then the two sides. I had to heat it up and bring it up to the level of the other two. Even thought I got it up to eye level i still had to add epoxy to make sure it was all even and that part is more rigid then before.


Tricky attempt lol but unfortunately no punt intending but you know 1 warm day or 1 slight shunt and all that effort will simply de laminate..but good idea..you'll notice the base sag as well after a while
www.qcustoms.co.nz
the area behind it loaded with aluminum mesh as the base, after i am done I will be having mesh all being held at the by screws, and not chicken wire mesh the good stuff. don't really see it sagging and the material it self has flexibility i would have to bend it at 45 or more to make it break. believe me its rigid my orbital sander is a bit taller then the opening and i had to push the bottom down a little just to get it in there.
Lol good to hear lol, hope it holds out, don't be afraid to mold it tho man. Much better knowing for you in the end it's 1 piece no filler
www.qcustoms.co.nz
really don't know whats so funny, and don't really know what you mean by molding it into one piece. thanks for the heads up
I have few different pieces to work on so a small bottle won't be enough. How much is the applicator gun for that cost??
'00 Mitsubishi Galant ES 4g64T (Samantha)
'01 Mitsubishi Galant ES 4g64 (Daily)
'02 Mitsubishi Galant ES 4g64 (SCRAPPED)
'00 Mitsubishi Galant ES 4g64 (SCRAPPED)
'91 Volvo 740 Turbo B230FT (SOLD)
'88 Mitsubishi Mighty Max (SOLD)
'91 Kawasaki ZX7 (SOLD)
'95 Kawasaki ZX9R


looks cool bro! can't wait to see finished results!
they cost about 50-60, i won't sell it to you for that much though, send me a pm if you want to buy we can work something out with one of the bottles that I have left.
 Posting Rules


Bookmarks