 Log in
 Register
 Reply With Quote
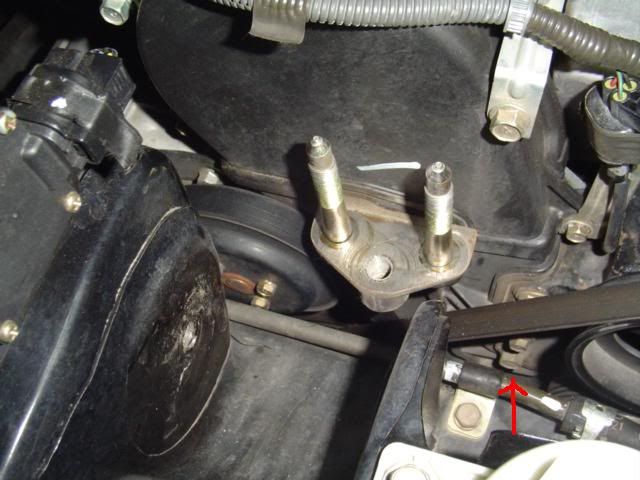
Picture is from "blkkamikazegs on club 3g" The red arrow is pointing right at the problem bolt.


Ok guys. I have looked everywhere on the net about removing a head gasket from a 2002 Mitsubishi Galant 2.4L. I haven't really found anything. I found a few things on here but it didn't really address the problem that I am having. Even the tutorial up top this post doesn't work in my browsers either. So what I did find was 2 things. 1. Autozone has repair information online. 2. I downloaded a manual online from a site that was selling them.
Now, after reading both repair info, they differ on 1 thing or more. The one in particular that is affecting me is the removal of the power steering pump bracket.
The Autozone information does not mention removing the bracket. This service guide I have says to remove the power steering bracket.
So after inspection, i have seen that the removal of the 3 out of 4 bolts is not a problem and can be done from the top of the car. The problem is the 4th bolt beside the timing belt cover. I have allready loossened it to find out that the bolt is longer than the clearance between the frame and front of the engine. The bolt must be about 3 inches or longer. Amount of free room between engine and frame is 2 inches at best. So after thinking I determined it would be easeier to lower the engine and trans on passenger side about 2 icnhes than trying to jack the motor up about 4 inches or so.
I tried lowering it a little with both front a rear mount bolted up and it wouldnt work.
So what do i do. I dont want to remove those front and rear mounts unless it is a have too.
Oh and the car blows white smoke really bad like a storm and the oil turns milky instantly. So I guess head/gasket got worse from it sitting for some time. I wasn't the driver but it is now my car. Thanks for any and all help provided.
If I wasn't too clear its because im in a hurry to do something else and i need this car fixed.
Picture is from "blkkamikazegs on club 3g" The red arrow is pointing right at the problem bolt.
Last edited by John165; 01-19-2011 at 04:21 PM


Im not sure why you'd need to take that off to do a head gasket. You really just need to remove the ignition coils and everything on top of the valve cover, the valve cover itself, intake tube, throttle cable, water pump pulley, timing covers, timing belt. Disconnect the front exhaust pipe from the exhaust manifold, then unbolt the head with the manifolds still attached, lift it straight up and out.
99' Galant ESOriginally Posted by qnz
4G64/63T
AEM EMS

no u dont need to remove that bolt , heat it up with a torch then try. but dont melt the plastic for the timing belt cover and belts.


Why would you tell him he doesn't need to remove that bolt, but then told him to heat it up with a torch?
1) He doesn't need to remove it.
2) He said he loosened it, but the bolt is too long and hits the frame.
3) Before using a torch, try some penetrating spray.
4) Never use a torch around the engine, and especially on the block or head itself.
JFC.
If you post stupid and incorrect information, you will get red nuggets.
Well it seems everyone agree's that the power steering pump bracket does not have to be removed. That will save me a lot of time and hardship lol. If anyone else has anything to add go right ahead. The more the better. Oh and I will return later about the head or what to do with it. Thanks for all the input. oh and i hope that crank pulley will slide off lol
Ok. My timing marks on Cam and oil sprocket are aligned.
Here is some pictures. One picture, the oil sprocket seems not to be aligned but on another angle it is.
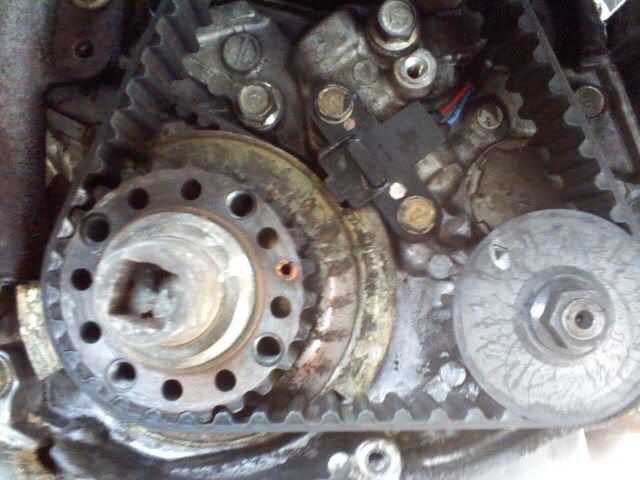
I need to know where the timing marks are on the crank sprocket. I see a V behind the sprocket but no marks on the sprocket itself.
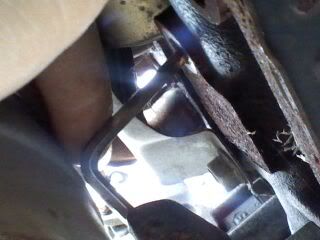
Oh and I inserted a allen wrench in oil shaft plug and the wrecnch went in all the way. Is that normal? Picture below with it inserted all the way in. The plug behind the manifold down pipe.
Help....
Last edited by John165; 01-20-2011 at 11:12 AM
I got past the timing belt and other stuff.
Now I am down to removing the valve cover and head bolts.
Anyone know what size of socket to get to fit the head bolts? I have read other posts here and else where but none never specified a 2002 Galant 2.4. From what I have read it is either a 12MM or 13MM 12pt socket.
I have to go buy a rubber hammer to remove the valve cover and I thought I could get the right socket and the hammer at the same time. Thanks.
It is a 12mm 12 pt. I just got done removing my head because of timing belt issues.
Thanks. I was wondering what is was. Btw did you send your head to a shop or anything? The thing is I have never sent anything to a machine shop and I have no idea what to have done to the head beside making sure the bottom is nice and straight.
Oh and another thing, you or anyone else know how much it would cost to have new valve stem seals installed and maybe checking the guides too?
I had a shop do mine, they cleaned it, replaced 8 intake valves and gaskets, and machined the bottom surface for a cost of $360. I already had the gaskets so that saved me some money.
Also:

That picture helps a lot. Now I know what to expect when I remove the valve cover.
If you had all that done for that price, then Im expecting it will cost me quite a bit more cause they would have to disassemble all 16 valves to replace the seals.
Before the car was took out of service, it used a lot of oil and since the head is gonna be removed I thought it would be a good time to have the seals replaced. I will go out on a limb and say the rings are ok. However the engine was overheated a little I think.
Oh and the reason I think the valve seals need replaced in addition to the car using oil is because the spark plugs are oil fouled and or carbon fouled. And these plugs are brand new with 2-4 Minutes of run time to move the car with a bad internal coolant leak.
If you can think of anything else to add, whether it be a picture or info please add it. The info can be useful to me now and other people in the future when searching. Agains thanks for the info and picture
I am assuming they disassembled the entire thing with mine, I doubt they would have reused any of the old seals. I don't think I have any before pictures, but the entire head was caked in oil and grease, plus the pistons has a LOT of oil + carbon build up on them.
Here is the other pic that I took:
I am going back today to hopefully finish up the job. The biggest issue I have run into so far was the coolant lines. I had to cut 5 of them because they would not come off the their metal ends, it was as if they were glued on.
Thats right. They would had to disassembled everything to put all new seals. I dont know what I was thinking lol. So the shops around here would probably be about the same in price. I havent checked yet but I am going to.
I ran into the same problem with the coolant lines. There was a small one going from the throttle body to the Thermostat housing that would not budge. And the heater hose going from the Thermostat housing to the firewall wouldn't budge either. So what I did was leave them intact. Another factor in addition to the hose being glued on from the heat I guess would also be the cold temps. I am almost sure I will have to cut mine too. Did you lift your head off with a hoist using the 2 hangers on the front and back, or did you have an assistant helping remove it? I have no idea how heavy they are except I know the intake is light.
Oh and one more thing, are you gonna use the special tools on the timing belt? When I removed the belt I just removed the auto tensioner and so I dont know what I will do when reassembling it. The tensioner pulley I left alone.
I had help lifting it out, it is on the heavy side but doable. I bought the timing belt tensioner tool, but I wanted to not leave anything to chance.
I am actually in the middle of replacing the balance shaft belt, just need to figure out how to make sure it is lined up correctly at there are two "correct" positions. The oil pump sprocket does line up using the fall/check method, but the balance shaft sprocket does not.
I didnt have to remove my balance shaft belt (it was new) but I did insert a allen wrench into the plug behind the manifold downpipe. I do know that my oil pump sprocket didnt move after I removed the front belt whether it be cause the allen wrench or that the balance shaft belt was still installed.
I have a service manual and it states:
5. Loosen timing belt tensioner center bolt, and move tensioner pulley toward water pump. Tighten center
bolt to secure tensioner. Remove front timing belt. Remove tensioner pulley and timing belt auto tensioner
CAUTION: This application is an interference engine. Do not rotate camshaft or
crankshaft when timing belt is removed, or engine damage may occur.
CAUTION: DO NOT rotate crankshaft counterclockwise (as viewed from timing
belt end of engine). If timing belt is to be reused, mark direction of
rotation before removing.
2003 Mitsubishi Galant LS
MITSUBISHI 2.4L 4-Cylinder - SOHC - VIN G (Except Outlander)
tensioner.
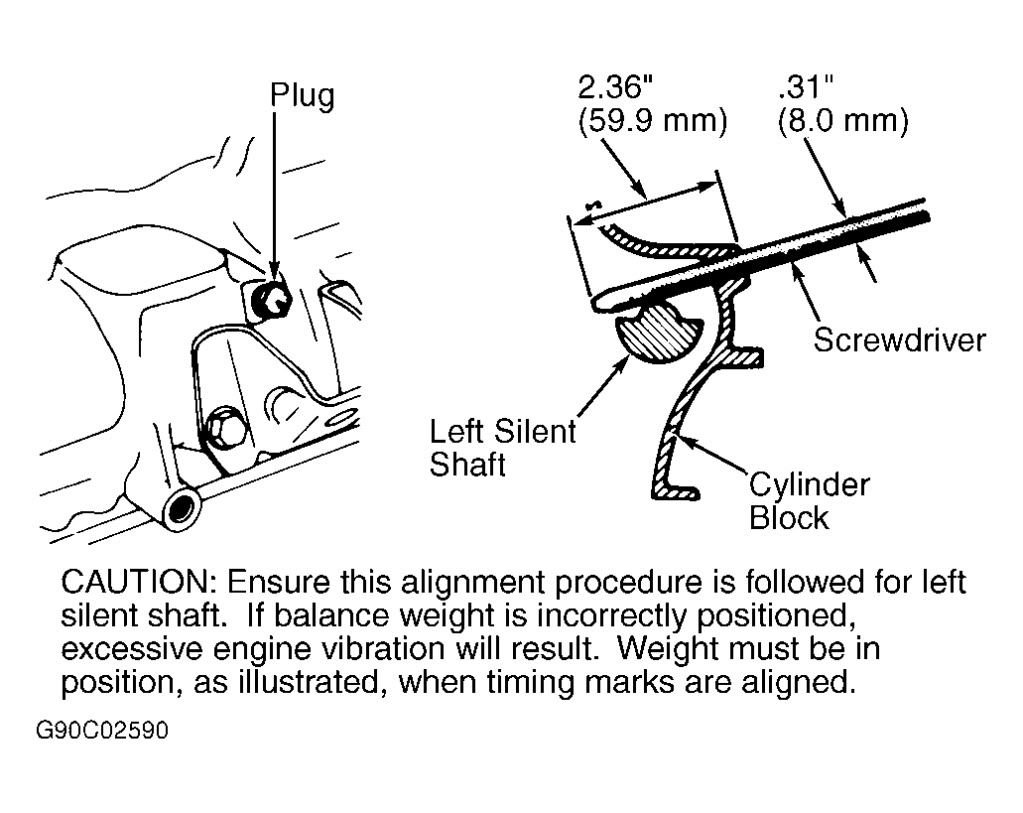
6. To remove balance shaft belt, remove left balance shaft access plug from cylinder block. Insert .31" (8.0
mm) diameter Phillips screwdriver to block left silent shaft. See Fig. 3 . Ensure screwdriver can be
inserted at least 2.36" (59.9 mm). Remove screwdriver if it cannot be inserted at least 2.36" (59.9 mm).
Rotate balance shaft one revolution and realign timing mark.
And here is a picture:
And after installing the front timing belt it says:
Remove Phillips screwdriver from engine block and install plug. To adjust timing belt tension, turn
crankshaft 1/4 revolution counterclockwise. Turn crankshaft clockwise until all timing marks are aligned.
So I guess the plug behind the manifold downpipe locks down the oil sprocket and balance shaft??? Or is there a plug on the other side of the block? I dont know. But I do know right now I have a allen wrench inserted into the plug.
Last edited by John165; 01-22-2011 at 11:22 PM
From what I have been told, the dedicated balance shaft sprocket only has the one position true position, as in you just line up the mark and call it good.
Thats good, it must be the oil pump that requires the special attention via fall/check method. Sounds like your set to install the timing belts. Hopefully today I'll have my head off today. Good luck and thanks for all the help and pictures you provided.
 Posting Rules


Bookmarks