The Galant Center - Powered by vBulletin

Thread: REAL Projector Retrofit for 8G Galant

Page 1 of 2 12 LastLast
Showing results 1 to 20 of 29
  1. #1

    REAL Projector Retrofit for 8G Galant

    Don't buy those crappy Halo Projectors from eBay guys. Not only are they made for HALOGEN bulbs, but they are just plain crappy. If you are going to do HID's, please do a retro, as H4 reflectors are notorious for being the King of Glare.

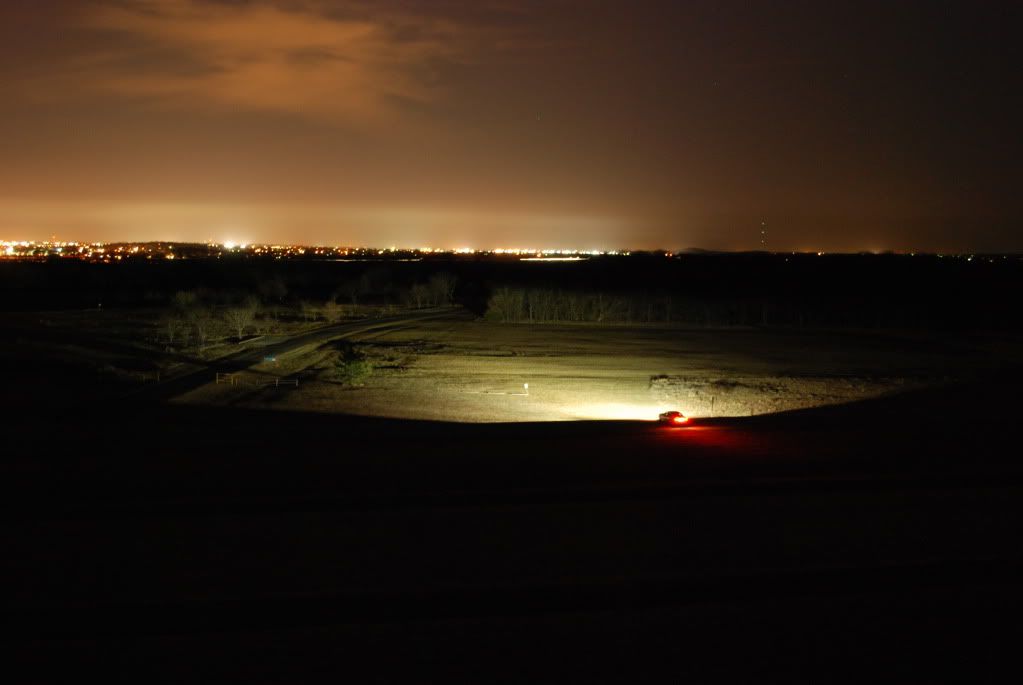
    This will cost you around 300$. Yes, 3 big ones. But, trust me, it will be worth it. That sexy cutoff line, REAL HID output, REAL CCFL's (optional), and the knowledge that you won't cause any accidents, well, not with your headlights at least.

    I got everything I needed over at TheRetrofitSource.

    I got the Morimoto Mini D2S kit, but I WOULD RECOMMEND THE MORIMOTO MINI H1 KIT, because our reflector bowls are actually too small to accommodate the bigger D2S. (I managed to cram mine in, so if you don't mind a tight squeeze the D2S is fine too)

    Get either the Mini H1 or D2S, both are good, and both are extremely easy to install for us H4 reflector guys. Trust me.

    Pick your setup, whether or not you want CCFL's (angel eyes), which shroud you want (E55 is the shortest in height, as I barely cleared our reflector bowls), and while you're at TRS get some BUTYL GLUE as you will need it to reseal your headlights.


    I AM NOT LIABLE FOR WHATEVER YOU DO TO YOUR HEADLIGHTS, CAR, SELF, OR OTHERS, DO THIS RETROFIT AT YOUR OWN RISK. THANKS.

    Materials Needed:
    1. Pen/Small Stick
    2. Flat head screwdriver
    3. Oven
    4. Primer/Paint + Auto body scuff pad(optional)
    5. 10mm Head + Ratchet


    Step 1: Remove your current Halogen/HID bulb from the headlight, and also the turn signal bulbs, place aside.

    Step 2: Remove the grilles, there are FOUR clips holding them in, just use a pen or small stick to depress the clips and unclip the grilles.

    Step 3: Remove the headlight, there are also FOUR screws holding them in. You will need a 10MM head to unscrew these bolts. One is clearly on the top, two are behind where the grilles used to be, and one is right next to the bulb for the turn signal. Place these bolts in a safe place, please don't lose them.

    Step 4: Preheat oven to 270* FAHRENHEIT

    Step 5: Making sure all pieces of the headlight that can be removed, are removed, place the headlight onto the oven rack, preferably in the middle, and set timer to 8 minutes.

    Step 6: WITH OVEN MITTS, take the headlight out of the oven, and place at workstation, quickly use a flat head screwdriver and stick it inbetween the two pieces. You will hear a popping noise, do not worry, this is just the glue separating. Work fast as the glue will cool down and harden again. Work your way around the headlight, running your flat head between the two pieces. you will eventually pry the two pieces apart. You are left with the lens, and the rest of the housing holding the reflector.

    Step 7: Remove the plastic cover on the horizontal adjustment knob, and begin loosening it. Alternate between the two adjustment knobs/screws until the reflector is out of the housing.

    Step 8: At this point, you need to make a decision, do you want to keep it chrome, or paint your reflector. I opted to keep it chrome the first time, but LISTEN, THERE WILL BE LIKE LEAKAGE FROM THE PROJECTOR THAT WILL REFLECT OFF PART OF THE REFLECTOR AND BLIND PEOPLE TO THE SIDE OF YOU, therefore, I suggest painting it black.

    Step 9: If you do not want to paint, skip this part and go to the part about installation. Remove the old bulb shield, it is held in by two screws. Next scuff up the reflector well, and then clean with soap and water. It should look like a POS.

    Paint Supplies Needed:
    1. 3M Body Scuff Pad
    2. Rustoleum Primer
    3. Rustoleum Paint (I used flat black to prevent glare)
    4. WELL VENTILATED AREA
    5. Patience


    You do not have to use those exact products if you know what you are doing. I am merely suggesting products that have worked for me.

    Step 10: Make sure it's dry, and then put a base coat of primer on, wait a few minutes, then another coat. Then let dry for a couple of hours, in the sun is even better.

    Step 11: When the primer has dried for a few hours, put the final coat on, then wait and few minutes, and another coat, make sure everything is even and covered.

    Step 12: Let the reflector dry for AT LEAST 12 HOURS. In the sun even better, if you live in a gloomy state, an oven or hairdryer will help speed up the process too. Mostly, just let it sit.

    Step 13: Your reflector is nice and painted, now comes the mounting of the projector. (Keep in mind I used the D2S projector, and the H1 projector MAY have a different mounting method). Take off everything off the back of the reflectors except the big white crush washer. Then insert the wires through the back, making sure the crush washer does not well, crush it.

    Step 14: Thread the H4 adapter plate onto the back (some trimming may be needed, I just used a knife) and then the o-ring, then the lock nut.

    Step 15: Make sure everything is tight, and then mount it back on the housing using the two adjustment screws.

    Step 16: Spread your Butyl glue aroudn the edges if you see that the original glue is lacking. Then preheat your oven back to 270, press the two pieces together, pop it in for 6-7 minutes, and then take it out and press the two pieces together.

    Step 17: Repeat with other headlight (YOU SHOULD DO THE TWO HEADLIGHTS TOGETHER, LOL)

    Step 18: Install the bulb into the back, install headlights into car, replace grille, setup wiring harness, and you are virtually DONE.

    (Instructions are also available from theretrofitsource, just ask)

    This is just a brief overview of the instructions, for more detailed ones, just ask in this thread, PM, or email TRS. Thanks for reading guys, and happy retrofitting.


    Last edited by hedonism; 07-23-2011 at 02:40 PM

  2. #2
    Experienced TGC Member 02redgalant's Avatar
    Join Date
    02-07-2007
    Location
    ORLANDO
    Posts
    1,599
    nice tutorial

    personally I would always stick with Oem projectors tsx TL's e46's fx35's .... just because of the wide spread use of them in retrofit applications and the proven output ..Oem bulbs usually start with D _ _ (d2s d2r etc) anything diff and there aftermarket and I always recommend oem d series bulbs vs any random hid kit bulb because of output is significantly better and quality the bulbs....; hidplanet is great place for info too....and checkout for wire harnesses on there also especially if you go bixenon so that you can have the hi silenoid function correctly or if you do dual projectors or hi reflector/low projectors they can both stay on when u flicker high's

  3. #3
    Quote Originally Posted by 02redgalant View Post
    nice tutorial

    personally I would always stick with Oem projectors tsx TL's e46's fx35's .... just because of the wide spread use of them in retrofit applications and the proven output ..Oem bulbs usually start with D _ _ (d2s d2r etc) anything diff and there aftermarket and I always recommend oem d series bulbs vs any random hid kit bulb because of output is significantly better and quality the bulbs....; hidplanet is great place for info too....and checkout for wire harnesses on there also especially if you go bixenon so that you can have the hi silenoid function correctly or if you do dual projectors or hi reflector/low projectors they can both stay on when u flicker high's
    Morimoto makes OEM quality D2S and H1 bulbs, so it shouldn't really be a problem. TRS includes a BiXenon harness that is pretty easy to understand.

    The reason I didn't use TSX or FX-R or something is because there is massive drilling/cutting involved. The Morimoto Mini's are designed to just be PnP.

  4. #4
    Experienced TGC Member
    Join Date
    10-18-2007
    Location
    Glen Burnie, MD
    Posts
    1,314
    My morimoto mini h1's work very well. Great light output.
    03 ES 5spd--Rota torque gloss black 17x8 et. 35--Hankook Ventus V12 evo 235/45/17--D2 coilovers--DC Sports STB--Intake--Brembo calipers--Powerslot Rotors--Stoptech Pads--SS brakes lines--35% tint--5k heads & 5k fogs--Alpine headunit--Kicker 400w amp--Alphasonix sub

  5. #5
    where u live? im in oly area.. nice to see a new member from WA!

  6. #6
    Booty Luva wetamup2k3g's Avatar
    Join Date
    12-13-2010
    Location
    Brooklyn, Maryland
    Posts
    4,643
    Good stuff, dude. I'm on HIDPlanet often, I plan on doing the FX-R's, but the 2.0's seem to have a cutoff shield defect, so I'm waiting for that to get fixed.

    -Greg

    "I smashed up the grey one, bought me a red;
    Every time we hit the parking lot we turn heads!"
    -Pimp C, "International Players Anthem"

  7. #7
    I live up in the Federal Way area, and what cut off defect are ou exactly referring to?

  8. #8
    Booty Luva wetamup2k3g's Avatar
    Join Date
    12-13-2010
    Location
    Brooklyn, Maryland
    Posts
    4,643
    Quote Originally Posted by hedonism View Post
    I live up in the Federal Way area, and what cut off defect are ou exactly referring to?
    Apparently even with a quality install, the cutoffs bow downward on the nex FX-R 2.0's. See the below links for what I'm talking about:

    http://www.hidplanet.com/forums/show...g-cutoff-issue

    http://www.hidplanet.com/forums/show...read-this-time...

    -Greg

    "I smashed up the grey one, bought me a red;
    Every time we hit the parking lot we turn heads!"
    -Pimp C, "International Players Anthem"

  9. #9
    Quote Originally Posted by wetamup2k3g View Post
    Apparently even with a quality install, the cutoffs bow downward on the nex FX-R 2.0's. See the below links for what I'm talking about:

    http://www.hidplanet.com/forums/show...g-cutoff-issue

    http://www.hidplanet.com/forums/show...read-this-time...
    Ah, I've also seen that, coupled with the labor intensive install, I'm sure a bunch of people are not, not happy. Lol.

  10. #10
    Quote Originally Posted by wetamup2k3g View Post
    Apparently even with a quality install, the cutoffs bow downward on the nex FX-R 2.0's. See the below links for what I'm talking about:

    http://www.hidplanet.com/forums/show...g-cutoff-issue

    http://www.hidplanet.com/forums/show...read-this-time...
    How about the TL one's? They look hella nice.

  11. #11
    Booty Luva wetamup2k3g's Avatar
    Join Date
    12-13-2010
    Location
    Brooklyn, Maryland
    Posts
    4,643
    Exactly!! You take all that time and get left with that? The one dude smashed his with a sledge he was so mad.

    -Greg

    "I smashed up the grey one, bought me a red;
    Every time we hit the parking lot we turn heads!"
    -Pimp C, "International Players Anthem"

  12. #12
    Booty Luva wetamup2k3g's Avatar
    Join Date
    12-13-2010
    Location
    Brooklyn, Maryland
    Posts
    4,643
    Quote Originally Posted by hedonism View Post
    How about the TL one's? They look hella nice.
    I think they are too big for 8G housings, but I could be wrong. I know the FX's fit though. The TL's are nice, ever get some TL highbeams in your mirror? You'll remember it, for sure!!

    -Greg

    "I smashed up the grey one, bought me a red;
    Every time we hit the parking lot we turn heads!"
    -Pimp C, "International Players Anthem"

  13. #13
    Quote Originally Posted by wetamup2k3g View Post
    I think they are too big for 8G housings, but I could be wrong. I know the FX's fit though. The TL's are nice, ever get some TL highbeams in your mirror? You'll remember it, for sure!!


  14. #14
    Experienced TGC Member OMEGA PHX's Avatar
    Join Date
    05-03-2009
    Location
    Aguadilla, Puerto Rico
    Posts
    1,465

    About painting or not painting the reflector, you could use some aluminum tape to cover the holes so light doesn't bleed, but I painted mine because I didn't like the idea of seeing the ugly projector reflection on the reflector. And I think TL's would fit but without the reflector, (I'm just saying I'm not sure), So you would need to fabricate brackets and adjustment screws and a way to cover the projector

    I have FX-R's 1.0 and they are great but TL's are unreal, so evenly lit you see that cutoff and you see quality.
    Last edited by OMEGA PHX; 07-23-2011 at 04:51 PM

    4g64T 5spd

  15. #15
    Quote Originally Posted by hedonism View Post
    I live up in the Federal Way area, and what cut off defect are ou exactly referring to?
    .
    sweet you live right next to chaps (justin) you might have seen his galant around the area.

  16. #16
    Booty Luva wetamup2k3g's Avatar
    Join Date
    12-13-2010
    Location
    Brooklyn, Maryland
    Posts
    4,643
    Quote Originally Posted by hedonism View Post


    For those who don't know, the top light pattern is from the TL projectors, the bottom is from the FX-R. Those light patterns are light years better than what HID kits in reflector housings can produce, period.

    -Greg

    "I smashed up the grey one, bought me a red;
    Every time we hit the parking lot we turn heads!"
    -Pimp C, "International Players Anthem"

  17. #17
    Senior TGC Member mrg7243's Avatar
    Join Date
    11-29-2009
    Location
    Chadds Ford, PA
    Posts
    2,768
    can you post some pics of your car from a distance head on?

  18. #18
    TGC Lifetime Patron oakrdrs187's Avatar
    Join Date
    05-14-2010
    Location
    Coachella, CA
    Posts
    5,954
    Lexus LS 430, Nuff said.

  19. #19

  20. #20
    Experienced TGC Member carl3g's Avatar
    Join Date
    03-16-2010
    Location
    Maplewood, NJ
    Posts
    1,290
    I assume these are the mini D2S 2.0 right? I have the gen 1 and I am not happy with them. I might go out and spend the $120 bucks to hopefully have better lights.

Page 1 of 2 12 LastLast

Posting Rules

  • You may not post new threads
  • You may not post replies
  • You may not post attachments
  • You may not edit your posts
  •