The Galant Center - Powered by vBulletin

Thread: Turbocharging your 7g for noobies.

Showing results 1 to 14 of 14
  1. #1
    Moderator mko's Avatar
    Join Date
    09-20-2007
    Location
    Sea Isle city, NJ
    Posts
    4,098

    Turbocharging your 7g for noobies.

    Ok, things cant get any simpler than this. 7g 4g64 is a part of the DSM family and as you know the 4g63 engine is the best bang for your buck or in another words cheapest horse power out on the market. Although having a couple of differences from its turbocharged brother - SOHC head, distributor and no knock control, the 4g64 is almost the same engine.

    Im going to explain about each component that has to be changed or upgraded, things that need to be added, and also the options of different components. Its your choice which one you want to use or if you want to use it at all. Im going to talk about gaskets, OEM upgrades and bolts/nuts and how things work in general and more specifically in your freshly turboed engine.

    Because we are going to be turbocharging a stock 4g64 with "soft" pistons and most likely with a lot of miles on it with safe boost of 8-10psi, I will only talk about OEM components out of a DSM/EVO. What I mean is that I will be talking about 14b, 16g, stock manifolds and etc. Since this is very basic forced induction, T3, T4, V-bands, external wastegates and so on will be left out of the discussion.

    Turbochargers

    14b and 16g are probably the best turbos suiting our platform. Before you buy one, make sure it doesnt have any shaft play, chipped fins or if it has been smoking before removal. If you got one in a bad shape, its easy to throw a rebuild kit on it. I've rebuild all turbos that I've owned so far.

    A common upgrade for the 14b is a 7cm2 exhaust housing. Why? The 7cm2 housing was originally found on Evo3 which was matched to 2.5'' manifold outlet for better flow and less back pressure. 7cm2 housing will give you a slightly slower spool, but you have to keep in mind that spooling a turbo is never a problem for 4g64, ok!

    6cm vs. 7cm ported


    6cm vs. 7cm unported


    Manifolds

    You basically have 5-6 options - 1g, 2g, EVO3, tubular and other cast and tubular manifolds.

    1g - I will not suggest using it unless you're really broke and cant afford 2g manifold, but if you're broke then maybe you shouldnt be turboing your Galant in first place. It has 2 1/8'' outlet.

    2g and Evo3 - 2g has a good manifold, but not as good as Evo3 one. The 2g manifold has 2.25'' outlet while the Evo3 outlet is 2.5''. You can try and port the 2g manifold to 2.5'' and you'll get the same results as if you have had Evo3 manifold.

    Evo3 vs. 2g


    1g vs. Evo3


    Tubular manifolds - the cheapest you can find is the ebay ones, but remember that you get what you pay for. If you happen to get one, you might want to reinforce the welds and then reinforce the whole structure of the manifold.

    This is what you're going to get from ebay:


    There other more expensive manifolds out there, both cast and tubular, but for simple reason to have a turbocharged car on a budged, I will leave them out.


    O2 housings

    This the part where the exhaust gases pass through after they have gone through the turbo housing and spun the turbine wheel. The o2 housing is mounted to the turbo housing with 3 bolts and 1 stud and nut. It guides the gases coming from the turbo housing to the actual exhaust system. It's called o2 housing because this is where the DSMs have the front o2 sensor. On 7g, depending what year it is, the front 02 sensor can be on the header or right before the catalyc converter. To relocate your stock o2 sensor to the o2 housing you will have to extend the wires.

    Again, there are 4-5 options for these o2 housings.

    1g - again, unless you're broke or getting it for free, I'd suggest not to use this one. It's very restrictive even for 1g.
    2g - a little better than 1g housing. It has 2.25'' outlet and the good thing about it is the all ebay downpipes are made to fit 2g O2 housing.
    Evo3 - the best OEM upgrade. It has 2.5'' outlet, but the bolt pattern is different/wider than 2g o2 housing. The stock 2g and the ebay downpipes are not a direct bolt affair with this one.
    Stainless Steel/Ebay housings come in two options - with recirculated wastegate or open dump. They both have evo3 downpipe bolt pattern and are not bolt on to the stock or ebay downpipes.

    2g vs 1g housing


    Stainless vs. 2g housings


    2g vs. Evo3 housing


    Downpipes

    The options here are limited. You either go buy some metal and put it together yourself or just buy the well proven ebay downpipe for 2g GST. It's a great piece and it works with 2g o2 housings. The only thing is that the neck after the flange and the first bend has to be extended 1.5 -2'' because it is meant for 2.0 and not for 2.4L engine. Its not a bolt on to the stock cat, although it could be made to, but since we are talking turbos here, Im hoping that you've decided to upgrade the exhaust to at least 2.5'' or 3'' even better.

    This is what you're going to get


    J-PIPES

    There are so many j-pipes out on the market. Since we want to be cool and of course for better cooling of that hot air coming out of the turbo, we shall use the FMIC or front mounted intercooler. For that reason we want a j-pipe designed for FMIC, and not for a side mount or any other intercooler location.

    This is the FMIC j-pipe.


    This is the stock j-pipe usually seen on 1g DSMs


    1g vs. aftermarket


    The thing about the aftermarket j-pipes is that they might interfere with the stock radiator fans. Some are designed no to, but all j-pipes, that I have used, required slim fans.

    Now look at the stock J-pipe and you'll see it has a nipple sticking out of the pipe. This is you boost source for the wastegate. From that nipple, you run a hose line to the wastegate nipple of your 14b or 16g. The wastegate spring for these turbo happens to be 10psi which is right at the save boost limit for budget build and homemade tune. Now none of the aftermarket j-pipes have that nipple, so you're going to need to make your own boost source. I've seen people JB Welding brass fittings on the j-pipes, but the rule here is that it has to be sourced as close to the turbo as possible. I always JB welded fittings on the first pipe after the j-pipe and it has worked for me so far.

    Intercooler and piping

    Depending on the size of the intercooler you got, you might end up cutting into the bumper support. Sawzall work very well when it comes to that. Why? You dont want to have to cut the bottom part of the front bumper and have the intercooler sticking out from the bottom. Here are a few pictures of the cutting that you might have to do.


    Next thing you want to do is to attach the IC to the bumper support. Usually the IC has bolt bungs welded to it on the top and the bottom. Mark the top bungs on the bumper support, drill thru the support and run bolts right thru it to the IC. If you IC isnt that tall you can fabricate some aluminum hangers out of $5 aluminum plank found in the hardware isle at Home depot.

    Looks some like this:


    There are different ways to run the IC piping. There is a short route, long route and there's a medium route.

    Long route - this the simplest to do, but it requires most material.

    This is the basic layout of the long route. The pipes go around the radiator support, right side to the j-pipe and the left side to the upper intercooler pipe (UICP).


    Short route - it requires cutting into the radiator support, precise measuring and welding of the bends. I mean it looks very neat, but its not worth the hassle.

    Not very clear, but the IC pipes run on both sides of the radiator


    Medium route - is a mixed long and short routes. Right side goes around the radiator support and the left side goes through the radiator support. Im currently using this route and I'll tell you its very easy to put together and cheap as well.


    Either one of these routes can be accomplished by using straight pipes with silicone bends, or aluminum bends with straight couplers. T-bolt clamps are mandatory. Ebay couplers are OK to use, but do yourself a favor and dont buy ebay t-bolt clamps. I'll post the NAPA part number for 2.5'' t-bolts, a little expensive at $5 each, but they are well worthy.

    Upper Intercooler Pipe (UICP) and blow off valve (BOV)

    I'm gonna circle back to UICP in a minute after I explain the two main types of UICP and the difference between them

    Ok, there are 3 types of forced induction air metering setups - draw-through, blow-through and speed density. The budget ones are the blow thru and draw thru.

    Draw though setup - the factory setup is a draw thru. That means that the air is drawn thru the Mass Airflow Sensor(MAS or MAF) before entering the turbo. This setup utilizes the stock MAS and a Super Airflow Converter (SAFC) which intercepts the signal just before it enters the ECU. With this setup, the intake pipe that connects the rear end of the MAS and the inlet of the turbo, needs to have BOV recirculation tube and the breather nipple. Why? Because the air is measured before entering the system, and once in the system,and lets say the BOV isnt recirculated back to the intake pipe, or the valve cover breather is not hooked up to the intake pipe, all that measured air leaves the system and the MAS reads it as a post-mas boost leak that causes rich conditions and will trow your tune off. Here you see a typical draw thru setup where the UICP has the BOV only.


    Blow through setup - its done by using a GM MAS and a Mass Airflow Translator (MAFT). What the MAFT does is to convert the GM signal to something that the Mitsubishi ECU would understand. Its called blow thru because the GM MAS is located on the UICP right before the throttle body and after the BOV and it measures the air that goes thru it. If the BOV is open and blows out to the atmosphere, it doesnt bother the MAS because the MAS is after the BOV and the BOV hasnt released metered air.

    Why cant we use the Stock Galant MAS in a blow thru setup? The whole unit that we refer to as MAF, actually contains 3 sensors - The Mass airflow sensor (MAS or MAF), Baro (pressure) sensor and Air temperature sensor (AIT). The last two sensors determine how the ECU reacts when outside temperature changes and altitude changes. Now imagine what the ECU would think when the BARo sensor reads boost (positive pressure) or the IAT reads some temps that its not supposed to read and on top of the the MAS tells the ECU something very different than it's used to. Now you have a complete mess.!! What the GM MAS has is only MAS sensor, no BARO, no IAT and the MAFT itself is set to have constant values, for these two sensors, that are fed to the ECU at all time regardless outside temp or altitude changes.

    This is how a blow-thru setup looks like and you see that the Upper intercooler pipe (UICP) is pretty much made of just GM MAS and BOV pipe.

    Last edited by mko; 12-12-2011 at 12:14 AM
    God created turbo lag to give the v8's a brief moment of hope.


    Build Thread

  2. #2
    Moderator mko's Avatar
    Join Date
    09-20-2007
    Location
    Sea Isle city, NJ
    Posts
    4,098
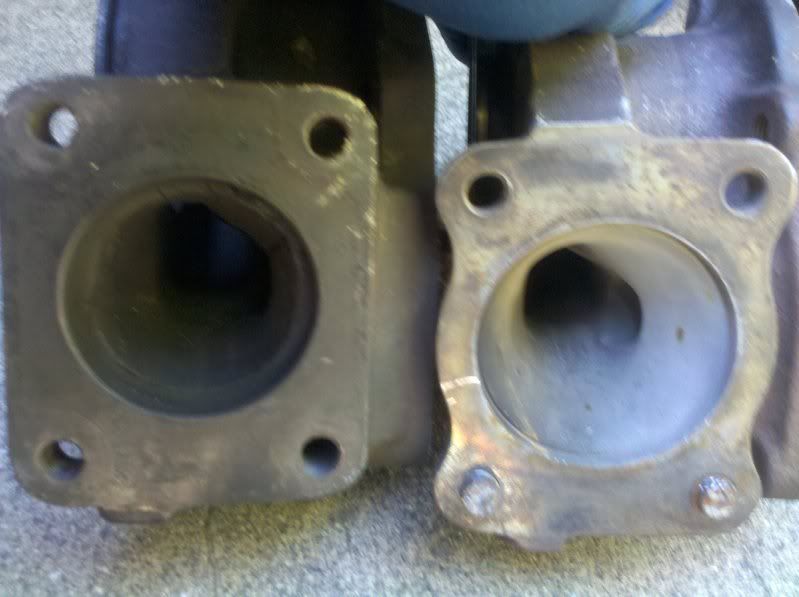
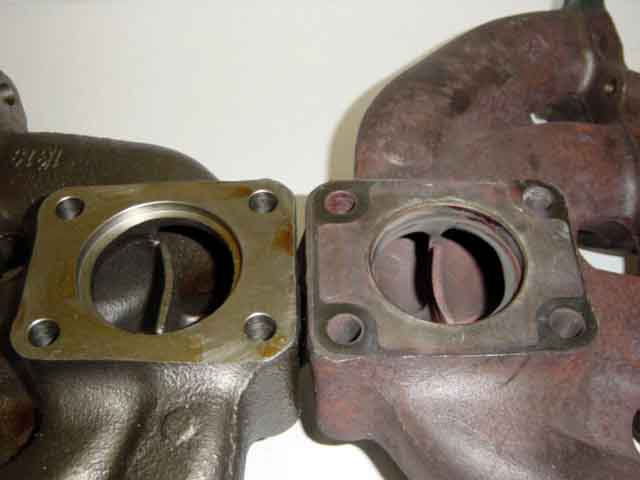
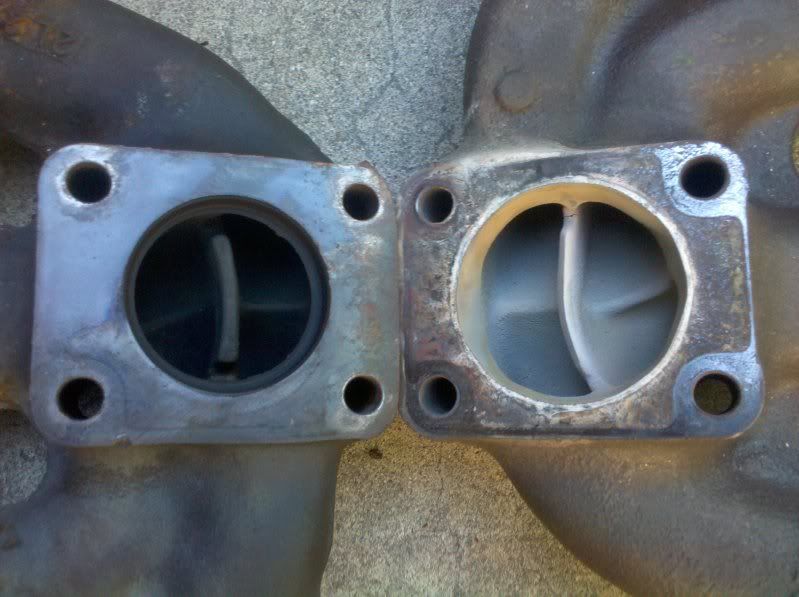
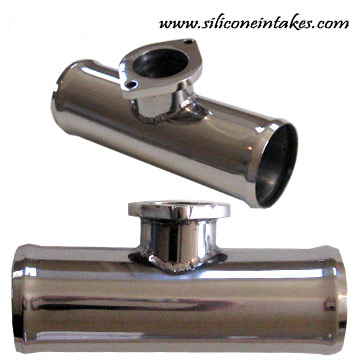
    The UICP has the BOV mounted on it, what it means is that at one point you'll have to decide what BOV you want to run. The budget solutions are 1g BOV or Greddy BOVs, I mean there are many BOVs out there that you may like. It all comes to how you want to do it. There are pre-made about 1ft long pipes with BOV flanges welded to it or its a whole thing made out of cast aluminum.


    Welded


    Cast


    If you want to use 1g BOV then it's best that you get 1g BOV elbow, cut the flange off and have a shop weld it for you. Dont take chances with 80-90 AMP flux welder and try to save $10-15 bucks. Same applies if you want custom UICP with the BOV maybe angled and other crazy things - have a shop weld it for you.

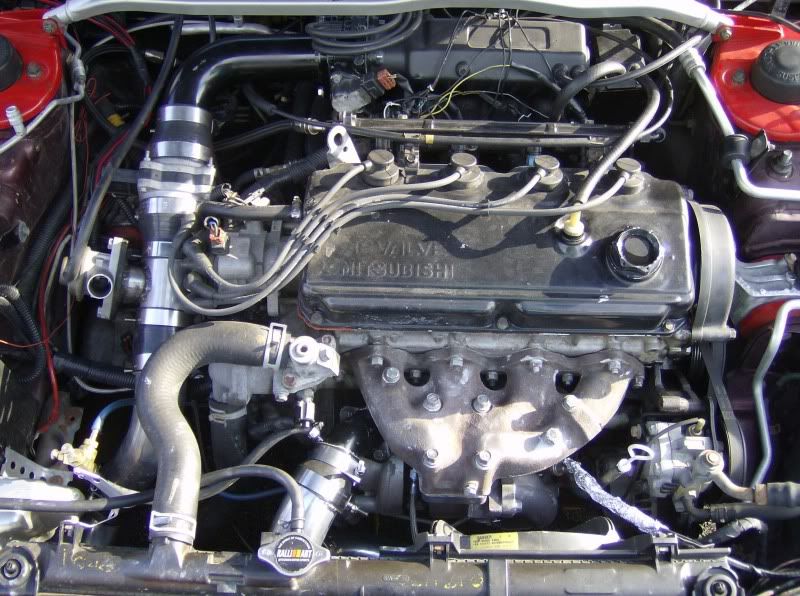
    Throttle Body and First bend

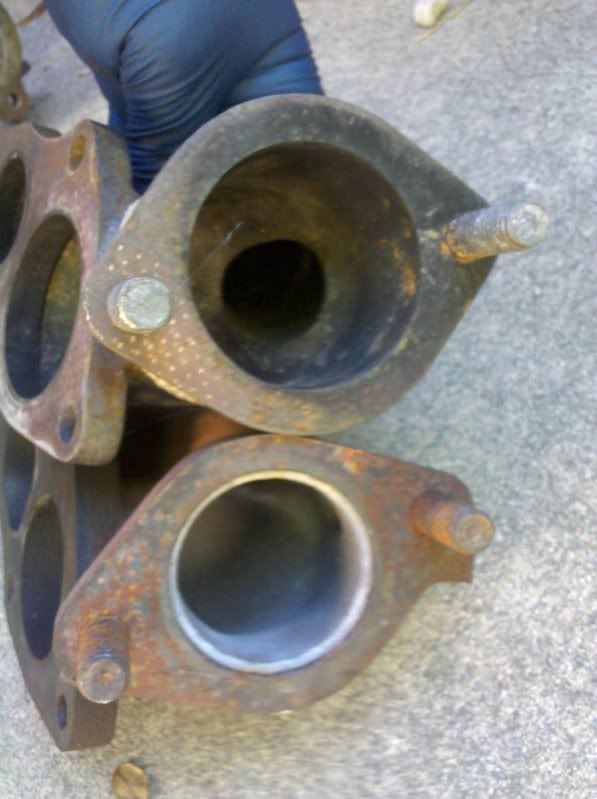
    If you look at the pictures above for the blow thru and draw thru setups, you'll see that the first bend after the TB is a long 90 degree bend. This is because of the distributor being in the way if you cut it short. It gets tricky if you want to use 1g or 2g turbo TBs. These TBs have a separate elbow that makes a sharp 45 degree turn and it runs straight into the distributor. So whatever TB you use just make sure you have that long 90 degree bend off the TB and save yourself the headache.
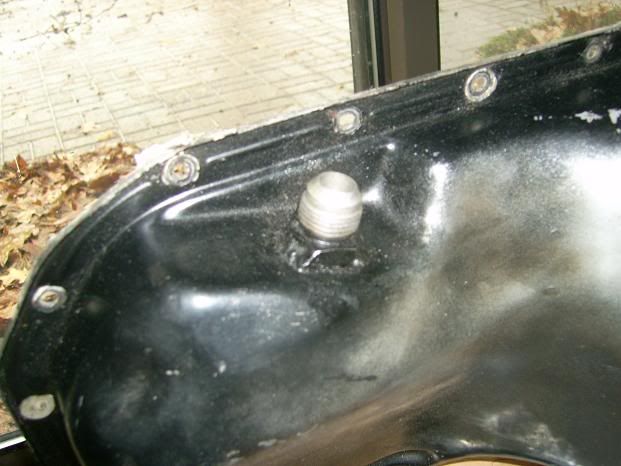
    Oil pan work

    There are 2 options here. You get 2g GST/GSX oil pan and swap it over or you remove you stock oil pan and have a 10an steel fitting welded on it.

    To remove the 7g oil pan, you want to get a flathead and drive it between the block and the oil pan with a few light tabs with the hammer. Do that to 3-4 spots and then pry the oil pan gently. Clean the block surface as best as you can.

    If you decide to use 2g oil pan, you want to wipe it clean and check for shavings on the bottom of it. Scrape any silicone use previously to seal the pan and give it a good wipe with acetone. Remember, do not use gasket there!! It's done with RTV from the factory and you want to stick with RTV as well. I have found that the best RTV to use is called : "Right Stuff - one minute gasket maker for oil pans and transmissions". It costs about $16 at any parts store.

    Stock 2g pan


    If you want you can use 7g pan and have a shop weld a 10an fitting. When welding, try to place the fitting as close to where the 2g hole would be and avoid welding the fitting under one of the bolt holes. Make sure its TIG welded, because you dont want to have leaks from the welds.


    Thats it! There are no shortcuts here. The oil pan has to come out.
    Last edited by mko; 12-12-2011 at 10:23 PM
    God created turbo lag to give the v8's a brief moment of hope.


    Build Thread

  3. #3
    Moderator mko's Avatar
    Join Date
    09-20-2007
    Location
    Sea Isle city, NJ
    Posts
    4,098
    Parts you need to be collecting to Force feed your Galant

    - turbo w/internal wastegate or external gate
    - oil return line
    - oil feed line
    - heat shield
    - O2 housing
    - o2 housing gasket
    - Turbo Manifold
    - new turbo to manifold bolts
    - manifold to turbo gasket
    - downpipe
    - downpipe gasket
    - j-pipe
    - j-pipe gasket
    - BOV
    - bov gasket (depending on BOV you use)
    - 2g oil pan or stock Galant oil pan with AN fitting welded to it
    - boost controller
    - 2.5'' ic piping
    - 2.5'' couplers
    - t bolt clamps
    - FMIC
    - DSM 450cc injectors or EVO 510cc injectors
    - DSM or EVO injector resistor pack
    - 2g intake pipe or custom pipe
    - fuel rail fittings (optional with AFPR)
    - Aeromotive Adjustable fuel pressure regulator - AFPR (optional)
    - vacuum manifold (optional)
    - misc. lines and hoses
    - wideband
    - boost gauge
    - fuel management - piggy back controller or 2g/EVO ecu
    Last edited by mko; 10-09-2014 at 08:18 PM
    God created turbo lag to give the v8's a brief moment of hope.


    Build Thread

  4. #4
    Moderator mko's Avatar
    Join Date
    09-20-2007
    Location
    Sea Isle city, NJ
    Posts
    4,098
    ,,,,reserved for updates
    God created turbo lag to give the v8's a brief moment of hope.


    Build Thread

  5. #5
    Moderator mko's Avatar
    Join Date
    09-20-2007
    Location
    Sea Isle city, NJ
    Posts
    4,098
    ..... reserved for updates
    God created turbo lag to give the v8's a brief moment of hope.


    Build Thread

  6. #6
    Senior TGC Member mrg7243's Avatar
    Join Date
    11-29-2009
    Location
    Chadds Ford, PA
    Posts
    2,768
    MKO kicked some ass here LOL

  7. #7
    Nice write up so far man,it is very helpful and well explained

  8. #8
    Booty Luva wetamup2k3g's Avatar
    Join Date
    12-13-2010
    Location
    Brooklyn, Maryland
    Posts
    4,643
    Damn that answered a lot of questions I had that I was too lazy to search out since FI is not in my immediate plans. Great write up bro (I can figure out why you did it though)!

    -Greg

    "I smashed up the grey one, bought me a red;
    Every time we hit the parking lot we turn heads!"
    -Pimp C, "International Players Anthem"

  9. #9
    Posey
    Guest
    WOOOO this awesome.

  10. #10
    Good stuff, answers a lot of questions I couldn't begin to think to ask. Thanks,
    jjj
    98 ES (5 spd), 94 GS (5 spd), 94 ES (rebuilt auto), 92 Toyota 4X4, 81 KZ550 A2, 67 Mercedes 250S, 58 Mercedes 190SL

  11. #11
    You are here entirely tooo much!! Galanttuner10's Avatar
    Join Date
    08-13-2008
    Location
    Waterbury, CT
    Posts
    3,331
    Looking good. The 7cm housing was on all 16g turbos big and small, the Evo 3 housing has a better design such as a larger wastegate outlet and bigger outlet around the turbine wheel. Also for the Evo 3 O2 housing, it not only needs a larger flange on the downpipe but it is also at a more critical angle than the 1g/2g housing so you would need extra work for that so you don't over stress the flex section and blow it out.
    2014 Lancer Evo GSR
    1996 Galant S 5 Speed Turbo
    Need a Turbo rebuilt or upgraded--> http://www.thegalantcenter.org/showt...ebuild-Service

  12. #12
    Buddy of mine just upgraded all his stuff on his EVO8 what he took off was turbo,injectors,valve springs,o2 housing,intercooler,aftermarket ss downpipe. Question is what can I use from all his old stuff? Oh I will be putting this on a stock dohc 4g64.

  13. #13
    You are here entirely tooo much!! Galanttuner10's Avatar
    Join Date
    08-13-2008
    Location
    Waterbury, CT
    Posts
    3,331
    you can use the injectors and the intercooler for the turbo setup, the valve springs will work in the head as well. i had a set of stock evo springs in my head but have taken them out to but in FP beehive springs
    2014 Lancer Evo GSR
    1996 Galant S 5 Speed Turbo
    Need a Turbo rebuilt or upgraded--> http://www.thegalantcenter.org/showt...ebuild-Service

  14. #14
    This article is rad. Super helpful.

Posting Rules

  • You may not post new threads
  • You may not post replies
  • You may not post attachments
  • You may not edit your posts
  •