 Log in
 Register


 Reply With Quote
Kerosene didn't destroy the plastic?Originally Posted by AktionCat


Ok! Been awhile since I've been able to customize the G!
Following whats been said HERE I took my hand at this.. Unfortunately I didn't realize how long it'd take to figure out how to remove the rivets that remove the cloth piece from the door, so i'm continuing onto today. Started with the backs also as it is way easier.
Soo at the "Remnant" isle I picked up 2 yards of Black Vinyl & some of that Super 77 Spray Adhesive by 3M for $20.. Spray was $10.47 or something..
Using a standard Flathead & Phillips, & Kerosene as a replacement for removing the sticky glue left over Pics will follow throughout today. I'm also skipping removing the Door insert from the actual door frame as this is a straightforward process..
So! 1st!
After removing the door frame from the car, That black foam piece is gonna be the easiest to remove.
Then you can remove the Window Switch
It has 3 screws, 2 on the front and then this one on the bottom.
Sooo, Everyone has different ideas of how to remove these tabs, I heated up this
and melted the tabs as best as I can to where they just slide out, but as you noticed I butchered it..
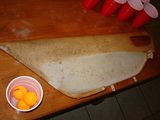
And here is the cloth piece sprayed & soaked in kerosene, then scrubbed to hell to try and remove that stuff.
Last edited by AktionCat; 07-30-2012 at 07:15 PM


Kerosene didn't destroy the plastic?
Not that I'm aware of, I soaked the shit out of it and let it sit for awhile.. As you can see it didn't make it perfectly clean, then again i used a wire brush for scrubbing and not a sander.
Why didn't you just put the vinyl over the existing fabric?


you dont want to do that because the existing fabric most likely is sagging.
just want to give you a tip, use a lot of glue, i did mine about 6 months ago and it is already starting to sag, i wish i used more glue.

If you butcher too many "rivets" that you can't connect it properly later like I did, you can drill into the remaining plastic and use short screws with broad heads.

when I had my vinyl put on i had them put the vynil over the existing fabric and its been on my car for the last 10 years with no problem and for 9 of those years my car has always been outside in the sun.
oh okay. good for you. my stock ones were sagging a lot.
I would bet that yours are too and you just cant tell.
mine never sagged either...but on one car i wrapped over, the other car i removed the factory leather, and there was cloth beneath it anyway...weird, but that never sagged either
as for the plastic rivets, i cut them off and replaced it with screws
maybe you missed the part where I said mine has not sagged, if yours sagged it could be because of bad prep work, too much glue or glue wait time was not followed.

I still have my factory fabric on my doors, its a 2002 so for 10 years its held up without sagging or separating, it should be fine if I just wrap over the fabric right?
hmmm wierd.. i guess i am the only one that the stock vinyl sagged on?
wtf lol.

my 02 6g72 is wavy?.. only on the driver side. i did my interior on my 4g64 and left side i used a soldering iron to take rivots off, then screws/very short staple for new fabric. right side i double it up over top of old, same install method. they seemed both equal for 1 yr afterwards. but car blew up so dont know which one would have lasted longer. :(
Sry guise it took forever.. My house was robbed and cameras and computers were taken so I don't have a way to put pics up,, You HAVE to remove as much as possible of the previous glue and fabric as much as you can otherwise it won't stick..
I let it sit in the kerosene for a good 15 minutes before I took a grill cleaner to it.. The hardest part was getting the rivets free.. Unfortunate for me I didn't have a soldering iron so I had to wait and heat up a flathead and bend them slowwlllyy.. It took foreverrr,, But there's no sagging, barely any loose vinyl. When I sprayed the adhesive I literally caked it on. The trick is letting it dry a bit so it retains it'sstickyness cuz if you put it on after spraying it's still an annoying as hell liquid and the vinyl slides.. After baking in the sun outside the adhesive seems to of evened out on the vinyl and it all just takes a bit of pushing and it stays on. I had my vinyl folded too for a good while so it had creases in it,, Glued it on and everything and as it got hot outside the glue moistened very slightly and I was able to get rid of the creases.. It came out way dope. I used some spray screwed to keep the plastic attached to the door using the inside of the rivets. Worked like a charm :D
*EDIT* My original fabric was sagging in the middle where the door curves, upon removing the fabric you'll notice there's like..no glue holding the fabric cuz it by factory default, curved,causing the fabric to come off the door.

looks good so far man.. and yea.. as domicano said, glue wait time is pretty crucial... i found that out the hard way... adhesive spray was a nightmare for me the first time around.. eugh
IMMORTALIZED CUSTOMS
Sid Mundo Production

~~demands picture of finished panels~~
pics please!!
Do you remember what size screws you used?
Short 1/8th
Sent from my LG-LS970 using Tapatalk 4

looks good man!
 Posting Rules


Bookmarks