 Log in
 Register
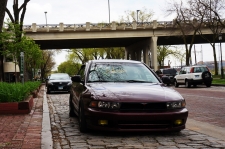 1999 Mitsubishi Galant ES
 Reply With Quote
Of course, EUDM swap will require conversions and modifications, but
This is the right approachOriginally Posted by gojirars


Dimushor on the contrary some of the parts do fit. And with the speedo the dimensions are similar to a diamantes. Anything can fit if there is time, patience, and money.

Of course, EUDM swap will require conversions and modifications, but
This is the right approach
Galant E15a EXE/4G63/1987/Ethanol Edition
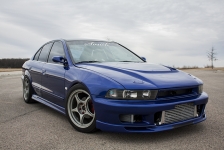
Found my good friend SpecialK's 8g earlier today.
And after a small meet earlier tonight.


Like both pics, but really like the angle of how the car is sitting in the parking space

Hi Rezal :)
Sent from my LG-LS980 using Tapatalk
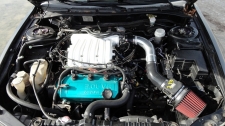
Nothing too much has been happening. Replaced the auto trans for another. Fixed a few things that needed to be addressed and installed a 3" 2G Eclipse cat-back exhaust with a majority of the work being done by Silvertune. This exhaust came from ebay and was originally perceived as being able to fit no problem and add an extension as many have claimed. This however was not the case. Due to this being an ebay product the quality has most likely suffered as companies found cheaper ways to produce these exhaust systems as time went. There was a lot of cutting involved and several pipes had to be welded not including figuring out how to remove the studs from the cat. As you can see in the pictures below it was not too bad but almost 5 hours went into this little project and the results were all the more satisfying. Going from a straight pipe to this is far far better then I expected. 10/10 would suggest that anyone do this.


I thought it was the 3g that was a bolt on with extension. Looks good either way.
Sent from my Z796C using Tapatalk
Currently on my 3rd 8G... Not giving up this time!

I used the same catback for babyg. Though I obviously only used it for pipe because 90% of it had to be modified to be able to run it under the axle, etc
Jigz-TGCIL Sosick Motorsports
R.I.P. Christopher "CRAZY CHRIS" Beckmann
"you dont appreciate friendship until you lose your bestfriend...."
I'd rather have the knowledge and ability to do it than the money to buy it already done.
Good to know. I was unaware that the 2g could be used.
Sent from my Z796C using Tapatalk
Currently on my 3rd 8G... Not giving up this time!


Glad to see the exhaust is on, Rezal. Can't wait to hear it on the way to the cookout next week.
My parts list has shown this for a couple years now ;)
'99 5-Speed GTZ: Forged 3.6L 6G74T 6764 E85
2017: 552whp/562wtq SBE on 19psi'02 Eclipse GT: 6G72 M/T-swapped Daily Driver'10 Endeavor: 6G75 AWD Family-mobile
Yesterday me and my buddy SpecialK hit up a local Upull and ended up pulling hubs and calipers for a disc swap. While there we found everything we were looking for but I noticed before leaving that there was a 9g that had fairly decent calipers and it looked similar to a 3g's so we decided to see if they would fit. After comparing and considering we mocked them up to a wrecked 3g and everything seemed to line up. So I decided that I would get them and see how well they did or did not fit. On the way back we also hit up an Autozone store and my friend got rotors and pads and in term of the other parts, I already had 4 backing plates from 3gs and rotors as well as pads. My friend ended up running the 3g eclipse calipers and the total time for his swap was around 3 hours since we had little to no idea what we were doing. Mine took half that time. The only things that needed to be modified was the backing plates and the 9g brake line end. Backing plate e-brake holes were drilled with a 21/64 drill bit to fit the stock Galant e-brake lines and then ground down until the hole for the clip and the top of it measured about 1/8". Modding the backing plates was straight forward after assessing what was need and can be done by yourself or with help. With the 9g part I used an angle grinder and lots of patience to grind it to fit a 17mm 6 point socket so that it will seat well and be able to properly be held in by the clip. If you ever do this note that you need to be extremely careful as to not grind the very top or go at an angle. Also heat will be important to watch so allow an appropriate time to let it cool or use something to cool it. This applies towards the backing plate parts too. Otherwise there isn't much to worry about aside from those. All in all it was a successful night and I am rather pleased with the outcome.

Nice ride!
Using Tapatalk

Good progress..... NoW Is 2014!!!!! Whats on the bubble wrap. Lol
Thanks!
The bubble wrap contained my JDM headlights!
And now......a little peak at what I have going in tomorrow......
Anyone else actually finish this dash swap??? I only need another day and it should be in 100% I will add more details tomorrow night depending if I get the time to. Basically Diamante dash and center console along with the center console frame. Airbag on passenger side has been modified to work and no srs codes involved. Doors are near to flush to the dash but the diamante is a tad taller (like 1 1/2"). Center console lines up almost too perfect, and the dash lower mounts can be bolted in with minor adjustment. Stay tuned haha.
Nice! , look fwd to finished results.


That is incredibly awesome!
-Greg
"I smashed up the grey one, bought me a red;
Every time we hit the parking lot we turn heads!"
-Pimp C, "International Players Anthem"

Great job!
15 F150 3.5 ecoboost 4x4 - daily driver
01 Galant ES V6 MT (sold)
00 Eclipse RS MT
Thank you!
It will be awesome when finished! I didn't know that the Diamante had SIX cup holders! (Not that I need them haha)
Thanks!
Now another not so far in progress pic. Just let everything sit in loosely but dash is mounted and door can close finally. SO MUCH TRIMMING IS INVOLVED. My opinion is to reuse a Galant dash. The only reason why I even did this is because I wanted to try being a little different and to see if this was possible. I saw someone else mention trying it but never any major progress nor any finished ones. Just pics of the dash sitting. Basically what I did was make custom brackets so it would mount properly and start measuring and trimming as I went. The side covers are going to be custom since the sides are trimmed. It was either the dash or door cards and for me the doors would not have looked very good once cut. The dash was shortened about and 1" in front and 1 1/2" on the sides. The center console brackets are close to Galant ones but need to be drilled out a bit and extended in the rear one. the center console frame is modified substantially and is not entirely necessary since the way I bolted the dash and console in kept everything pretty rigid. Waiting on my gauges to be finished so the stock Galant one will do till then. Next up is finding a way to get the glove box mounted nicely as well as the driver side panel. A lot of work and mistakes brought me to here but so far I am a lot more pleased after seeing where I started. Now I am nowhere near done but that's a little update on how this is going. And again....this is not an easy thing to do.
Edit* Anyone on here have a world spec dash for sale? Hehe...
I am done. For now. So much time went into this and I have learned enough. Still waiting on Diamante dash gauge cluster and an arduino unit to display OBD info and clock for the Diamante's clock unit. Also in process is a full functioning HVAC using the Diamante's climate control unit. Dash is in, center console is in, cup holders all work as well as cigarette sockets, black carpet is in, Diamante speakers wired in, and a bunch of other things. Last thing that is needed is the glove box, the one I had was pretty damaged so I removed it and will grab another at the yard. I'm tired as hell and it's going to stay as is until next month. Any questions just ask away, i'll try my best to answer them. This is not for people who want an easy project or don't have any patience. Looks great, smells better, and doesn't make me hate my interior anymore. Anybody know if Cleazy123 ever finished his? Just curious.

nice bro. looks amazing. i want to switch mine as well to black. but i was just gonna buy the stock half replacement on black and paint lol... is so much cleaner and nicer dash. looks great
 Posting Rules


 2000 Mitsubishi Galant ES
 1999 Mitsubishi Galant GTZ
 2002 Mitsubishi Eclipse GT


 2001 Mitsubishi Galant ES
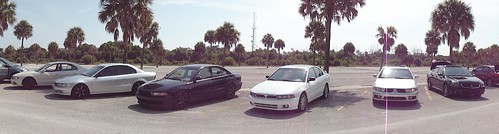


Bookmarks