

i decided to dig up this information to make it easier for the people who want to be spoon fed the information.
this was taken from club3g and it has all the infomation needed to do the swap (minus part numbers but im not doing the leg work for those)
Originally Posted by XwP1ayawX
 FINALLY... I got around to doing this. I blew through this thing in one session, so give me time to refine it and add to it. This should get you through the swap. Let me know if you find anything or have questions.
Let me begin with saying, this swap is easy. If you've pulled a 4-cyl head before on ANYTHING, this is a cakewalk. I had it basically done within a day.
I am not going to give you guys a list of tools needed, as every mechanic should know what they need to work on a vehicle. You WILL SPECIFICALLY need at 13mm 12pt socket for your head bolts. Other than that, all the basics that you use for any vehicle will apply here. If you don't know the difference between a 3/4” drive ratchet, and a box wrench... you needn't attempt this swap.
Parts list:
Hyundai/Kia Head including cams, springs, rockers, valves, retainers, lifters, yadda yadda
Valve cover
Adjustable cam gears – will go more into timing them up later
Hyundai/Kia water pipe and thermostat housing and thermostat
Evo intake manifold
Evo timing belt, or galant belt
Evo fuel rail
Evo FPR
Evo throttle body
Evo throttle cable
Evo camshaft reluctor and BOLT. The bolt is different and you need to order it along with the reluctor
Temperature sensor adapter off egay, DO NOT TRY AND TAP THE HYUNDAI THERM HOUSING
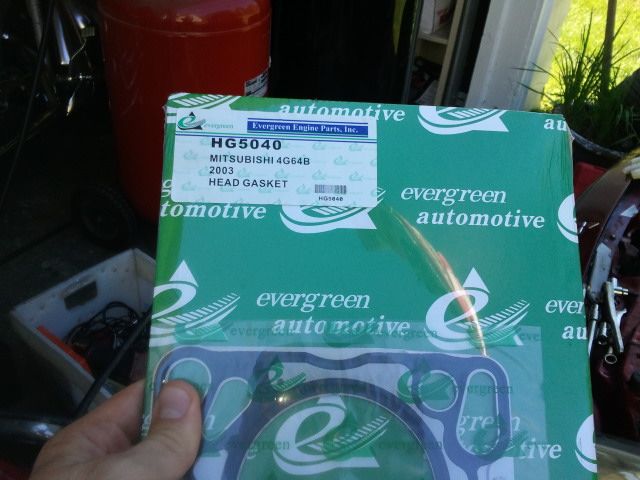
Head gasket
Intake manifold gasket
Exhaust manifold gasket
Valve cover gasket
Spark plug tube gaskets
New NGK plugs
Fluids
This install will begin with having the engine stripped down to the block. If you guys don't know how to do this, there's other write-ups on timing belt installs to get you to this point. You should have the head off the car, as well as all the intake manifold stuff disconnected like the sensor plugs, throttle cable.... you know the deal.
Sooo.... this is how you should be beginning.
I hadn't taken the water pipe or IM bracket off yet. You will need to remove those too. The water pipe just pulls right out of the water pump
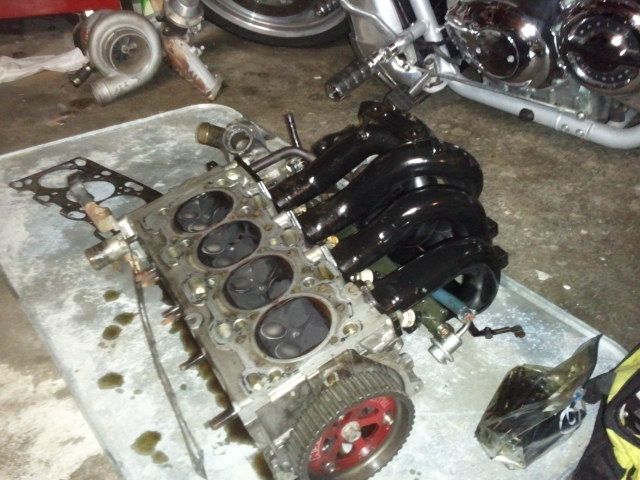
I took the old head off with the manifold still attached. Makes short work of it
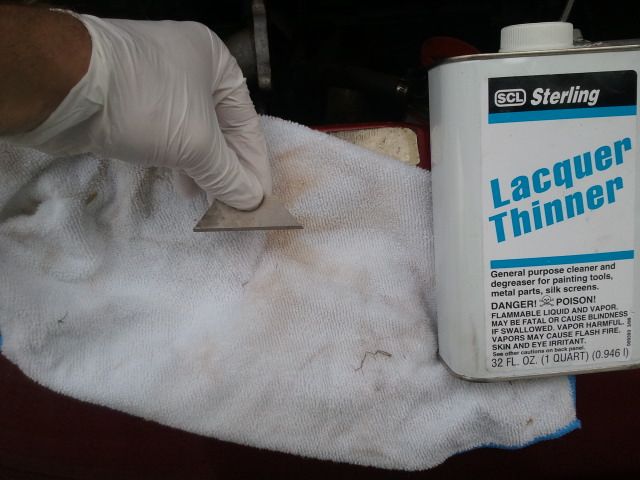
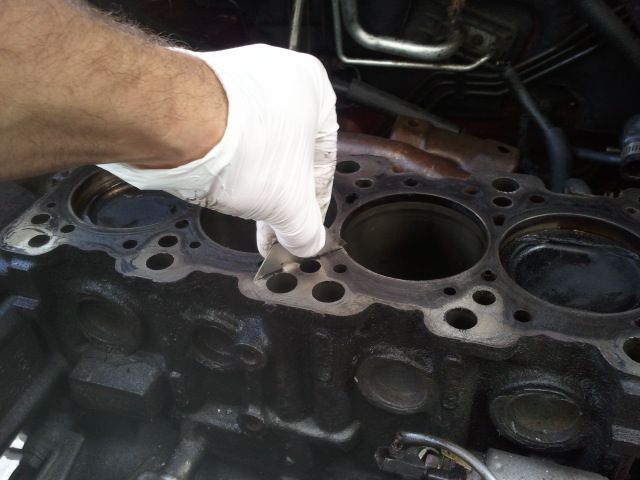
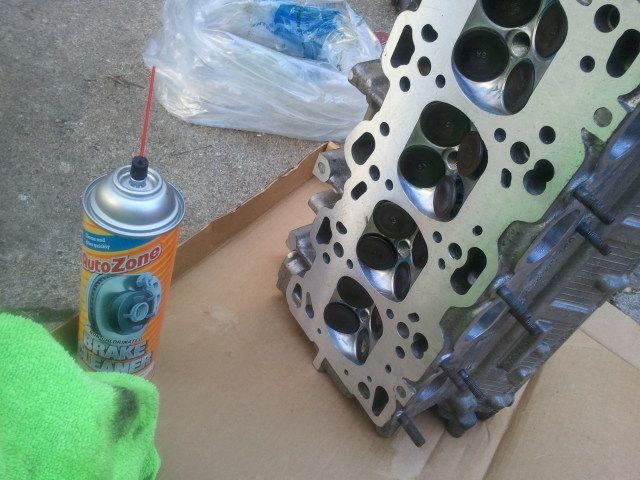
Now, you will need to clean the block up. I like using a razor blade, some lacquer thinner, q-tips, and a microfiber cloth. Microfiber is because it will not leave lint in journal holes and cylinders. You don't want any residue left behind.
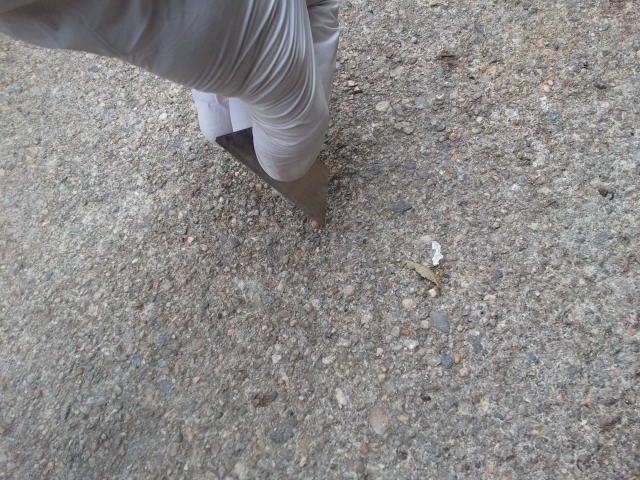
Scrape the ends of the razor on the ground to file down the points. You don't want to dig the point of the razor into the block surface, but rather hold it perpendicular to the block and clean off all the old residue.
This is how you will work the cleaning process. It's time consuming, but TAKE YOUR TIME and do it right. It's a hell of a lot easier than tearing down your motor because of a head gasket failure. Use the lacquer thinner to clean out the cylinders and wipe down the surface of the head when you are finished.
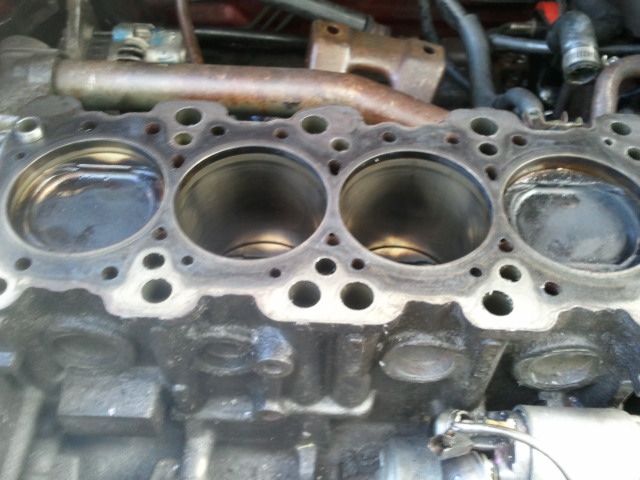
Looking pretty good
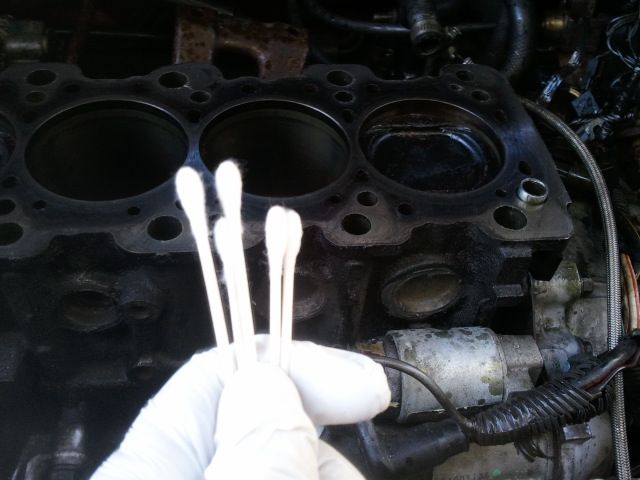
The q-tips will be used to clean all the gunk out of the head bolt holes. Simply sop up all the oil from each hole. It takes a little while. Also, keep using fresh q-tips. You want to be able to bottom out a q-tip in a hole and pull it out with it remaining relatively dry.
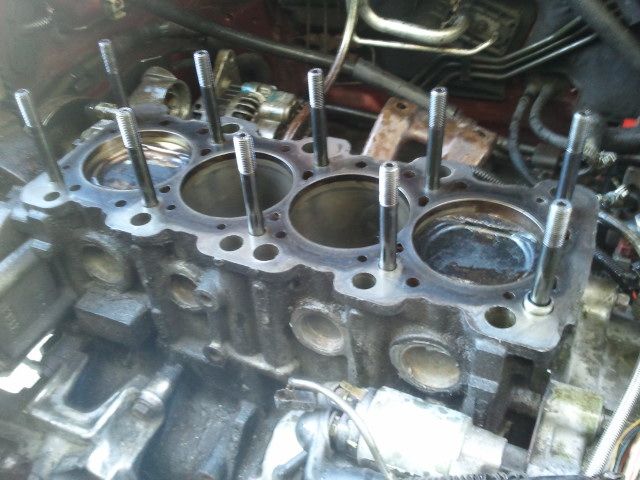
If you have head studs, now is the time to put them in. Make sure you oil them and torque them according to the correct spec. This is relative to what you are using for hardware.
Before we go any further, make sure you have the #1 piston at TDC.
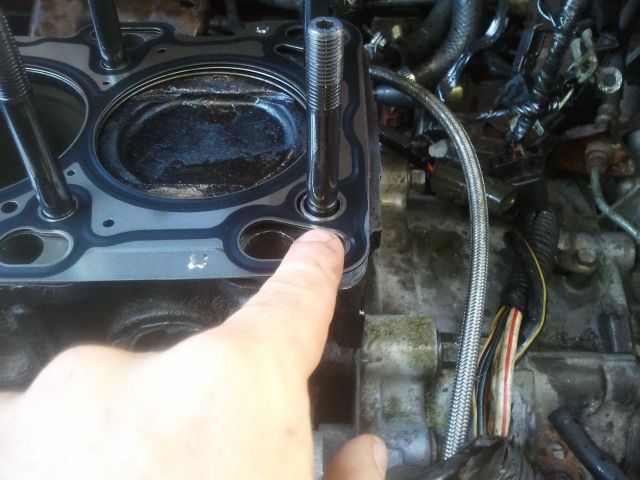
Make sure you are using a NEW head gasket
I had a fitment issue here. I filed a very small amount off of the HG to make it fit snug.
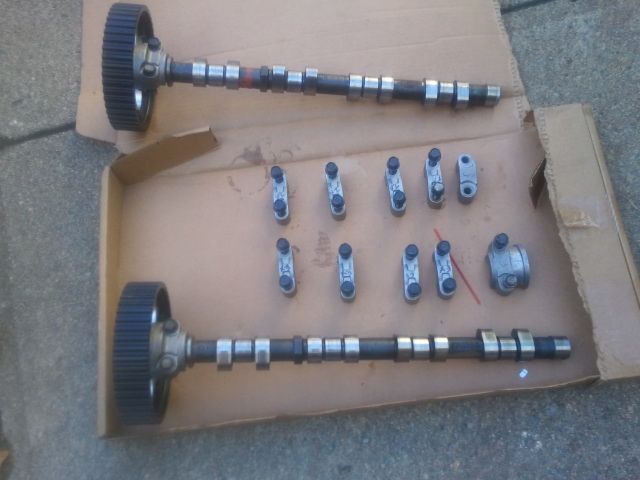
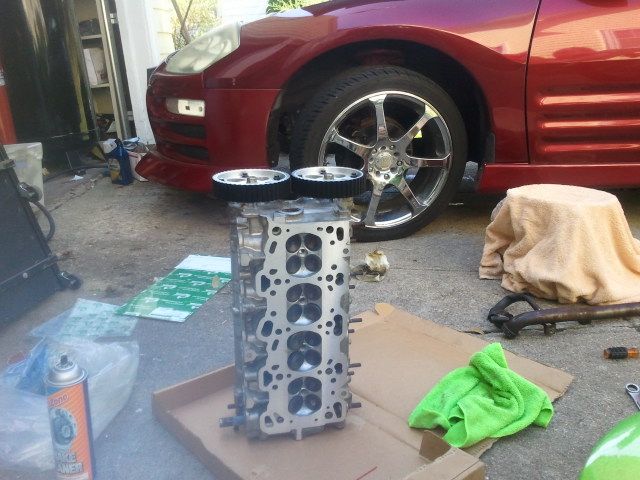
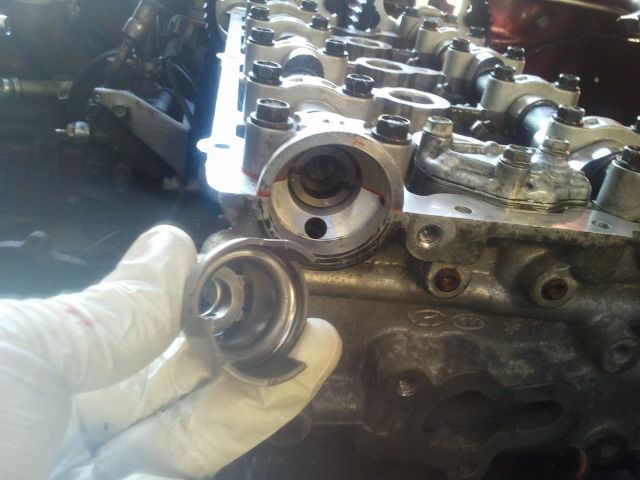
Before you even think about putting it on, we have to get a few things done. If you had your head rebuilt, you will most likely need to put fresh cam-seals in. You can see the seal on the right. Simply press it in as shown with a flathead screwdriver, working around it evenly until it is pressed in firmly against the head.
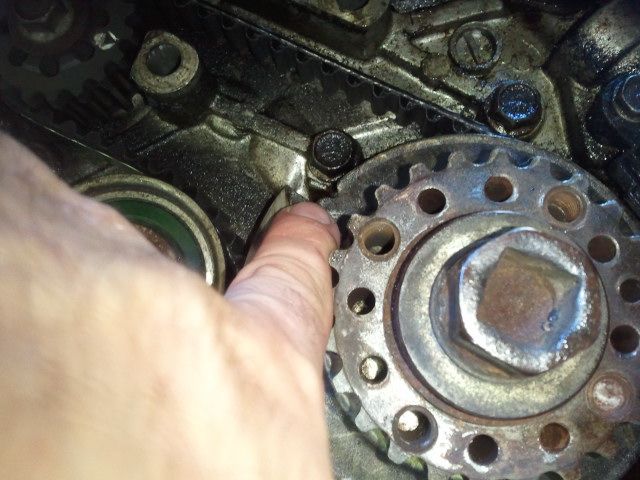
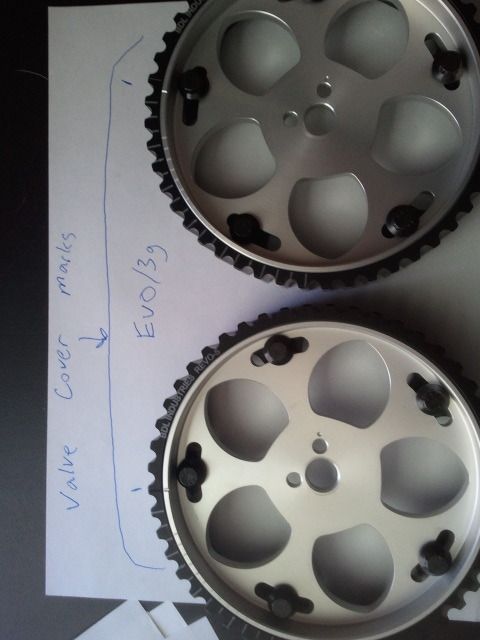
Now... cam gears. Here we go... if you don't follow, READ IT AGAIN. For some reason, people have a hard time understanding how to install and correctly set up cam gears. It's very simple...
When you are using adjustable cam gears, many manufacturers bore 2 holes on each gear. One for a DSM, one for an Evo. It's very obvious which hole to use. There could be 7 holes punched in the cam gear and it would still be obvious.
THIS is how an Evo or a 3g cam gear will be timed.
As you can see, the post on the cam lines up with the mark on the cam gear tooth. That mark on the tooth will be timed up with the mark on the valve cover. This is NOT how DSM's are timed.
DSM's are timed like this
The cam gears have marks on the side, and the gear marks line up with each-other. NOT the valve cover.
So, you are going to want to use the mark that lines up with the post on the cam. Only THEN will you be able to zero out the cams by lining them up with the valve cover marks. To install the gears, simply tap them on with a rubber mallet, and tighten down the 17mm bolt by sticking a big wrench on the cam to hold it in place, and torquing the cam gear bolt down. Food for thought, this is MUCH easier to do when the head is on the car.
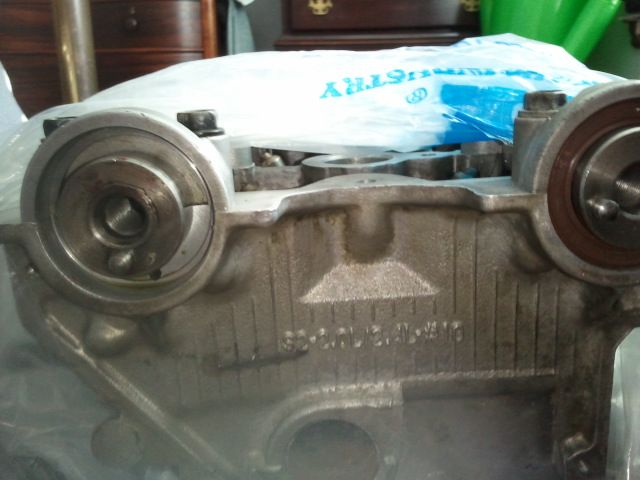
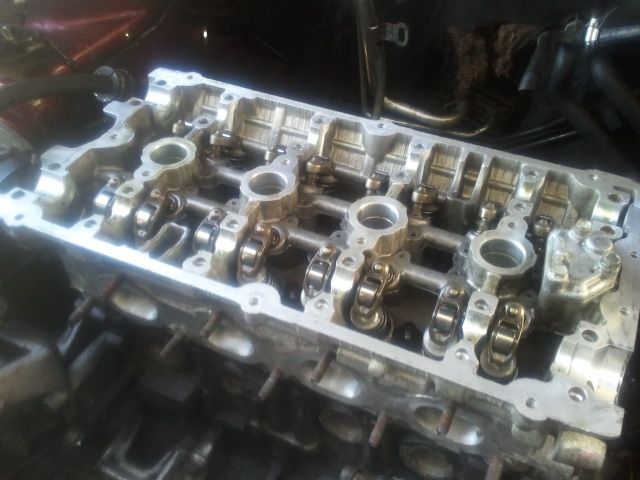
Next, INSPECT THE HEAD. Look for any surface imperfections in the process. I didn't inspect my head enough, and you will see why in a few posts. After you've given the head a thorough inspection, spray THE MATING SURFACE down with brake cleaner and wipe it off with a microfiber cloth. If your machinist worked the head, there will most likely be a film of oil on it. Make sure the surface is squeeky clean
Now it's time. We are about to install the head. Before we do that, we need to make SURE of a few things. If you have cams and gears in the head, set the cams at TDC. The block is at TDC, and if you try to torque a head down and it's not lined up properly, you can bet your ass that you're going to need a new set of valves. It's very easy to roll the cams into the proper positions with the head off the car. Even if your gears aren't on, you can put a wrench on the cams and move them so the posts are lined up with the valve cover. The EASIEST thing to do is to just pull the cams out. I had to pull my cams out anyway because my machinist forgot to put one of my rockers back on.
To get the cams out, simply remove all the journal caps as well as the reluctor. It's very easy. Be careful not to knock your rockers off. This is NOT necessary, I'm just including it because I had to re-install one of my rockers.
Make sure you put a bit of RTV on those last caps to keep oil from weeping out of the valve cover. It should go on both the end cam journal caps, right here.
This is how I made sure my cams were in the correct spot to be installed. DO NOT INSTALL THE HEAD WITH THE MARKS NOT IN THE CORRECT SPOT
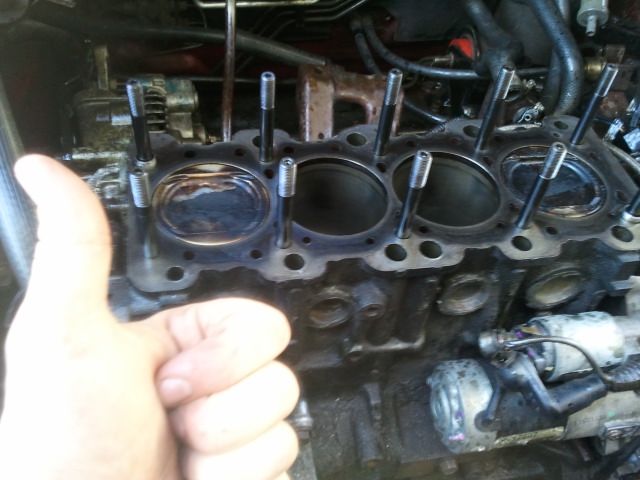
Nice, clean, and ready to go
If you chose to install the head with the cams and gears removed, you should be here right now. After torquing the head down, you can go ahead and reinstall the cams and gears, making sure to install the cams in the correct positions.
Now you can go ahead and either install your head bolts, or torque the nuts/washers onto your ARP head studs. Make sure you do it in increments and have a decent torque wrench. Make sure you torque each stud in the correct order. You should be using the service manual for both torque specs and more detailed information.
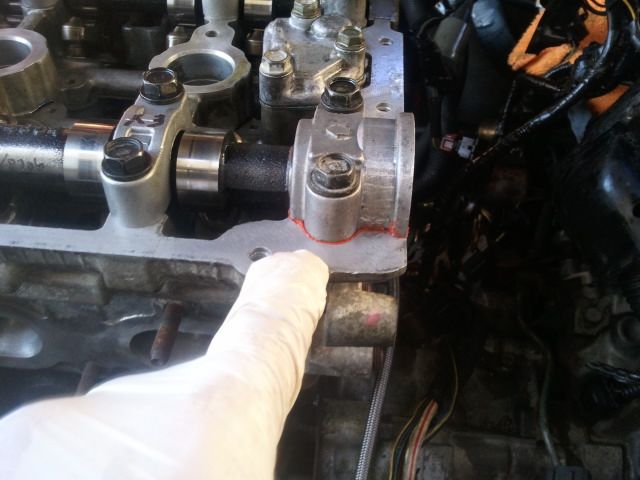
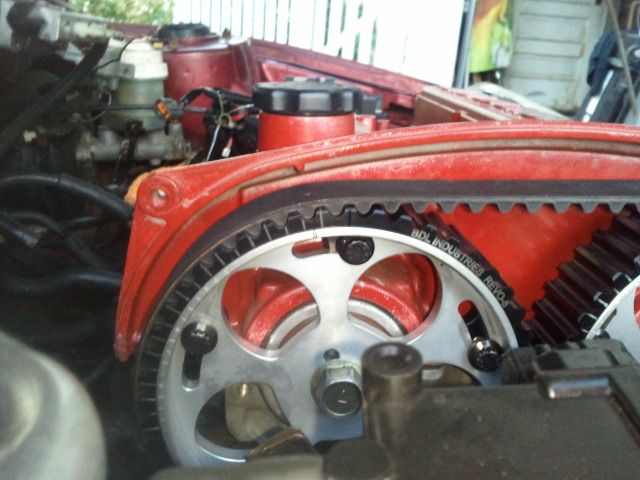
The head is now officially on the car and ready to be timed up. Now mock up your valve cover and line the marks on the gears up with the marks on the valve cover. ONCE AGAIN... MAKE SURE YOU ARE USING THE CORRECT HOLES. The dowel of the cam-shafts should line up with the marks in the cam gears. Both of the dowels should be facing upward towards the timing marks.
Alright. Now that those are in the correct position, go ahead and line your crank mark and your oil pump mark if you still have your balance shaft. Make sure you can stick a screwdriver in the hole under the starter on cylinder #3 to ensure that your oil pump sprocket is correctly aligned. The screwdriver should pass in a couple inches. If the screwdriver gets stopped, spin the oil pump sprocket around another 360 degrees and the screwdriver should pass easily now. Even if the marks are lined up, the balance shaft may be off by 360 degrees. You will see what I mean in the service manual.
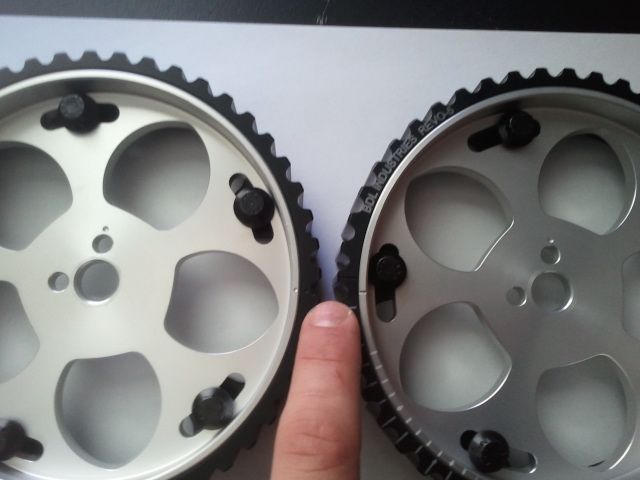
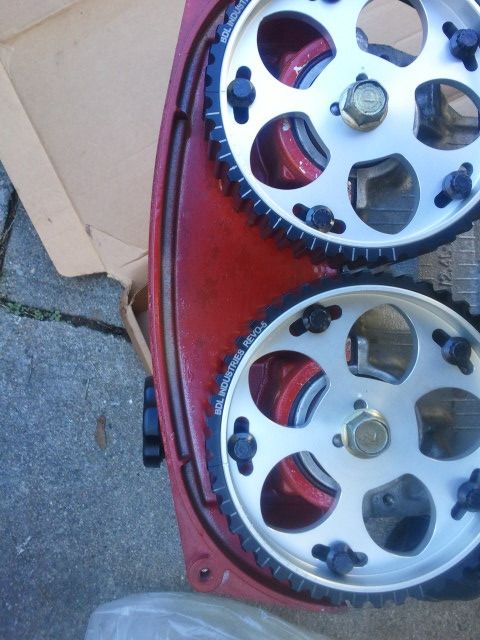
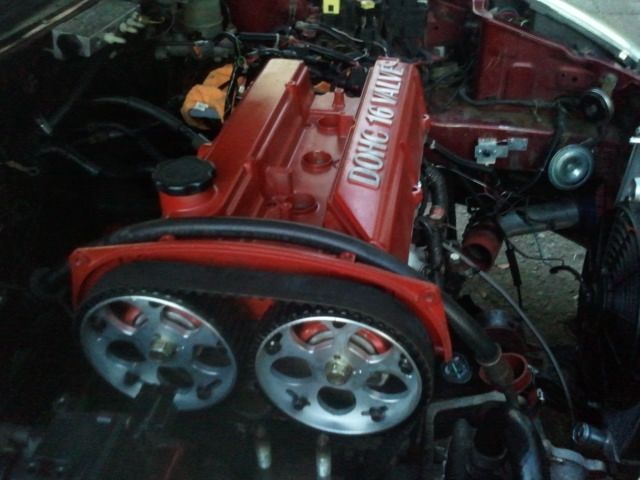
Now.. I used an Evo timing belt, it was all that was in stock locally, so I had no choice. This is the important part, the whole reason why you needed adjustable cam gears. With all of the timing marks lined up, go ahead and try to slip your belt on. If you're using an evo belt, it is an extremely tight fit (which I prefer due to having an auto-tensioner fail on me once). As you go to slip the belt on, you will notice that the teeth on the cam gears do NOT line up with the teeth on the belt. In order to slip the belt on, both of the cam gear outer rings must be moved over by a half tooth. THIS IS HOW YOU DO THIS.
1. Line all of your timing marks up
2. Loosen your adjustable cam gear bolts up to free up the cogged ring
3. Slide the rings over a half tooth and tighten the bolts back down
4. Install timing belt
5. Adjust tensioner pully to put tension on the belt
6. Install auto tensioner.
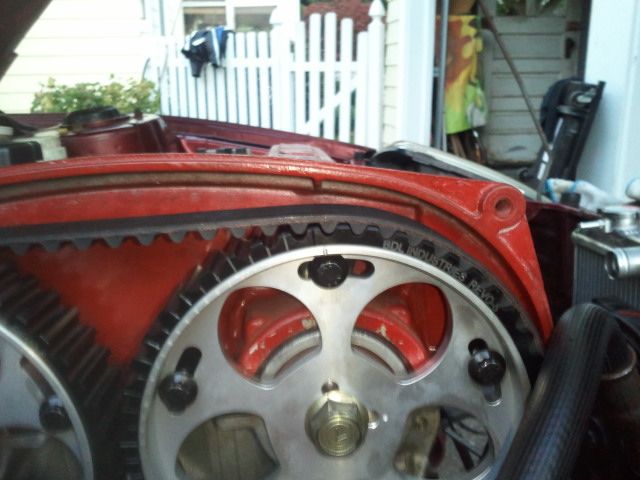
This is all you need to know. The camshaft does not EVER move during the install of the belt. The dowel for the camshaft remains lined up with the mark on the valve cover. The ONLY thing that moves is the outer ring. The entire setup is now zeroed out, regardless of what the cam gear ring states. For some reason people have a hard time understanding this. As long as both the cam dowels are lined up with the timing mark, and the crank and oil pump sprockets are line up with their marks, your car is zeroed out.
I purposely did my install like this to show people what I mean. As you can see
Both of the cog rings on these gears are in two different positions. If you look closely, the dowels on the cams are STILL lined up with the timing marks. The ONLY reason you are installing adjustable cam gears is so you are able to slip the belt on. You are NOT retarding or advancing the timing. You are using the gear to ZERO OUT your timing.
This is honestly NOT a difficult concept to understand. I even installed the cam gears in two different positions to further explain my point. If you don't get it, read it again, or better yet, do it yourself. Feel free to PM me if you don't get it. I blame this misconception on C3G members who have stated time and time again that you need to advance or retard your timing to go DOHC, this is simply not true and shows me that people don't fully understand what they are doing when they work on their cars.
Now you should be at this point.
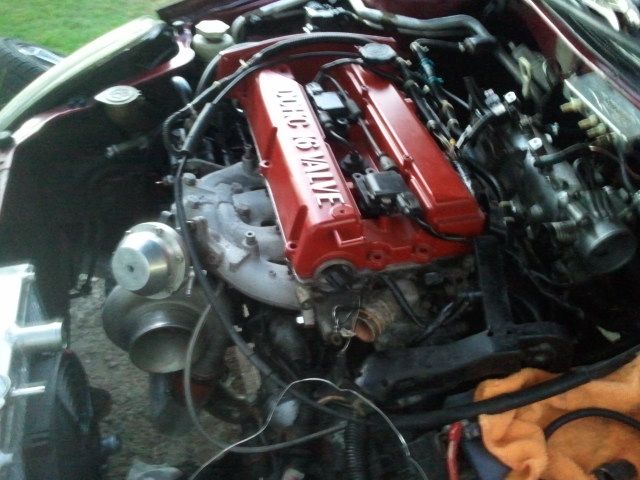
Go ahead and bolt on your manifolds. The exhaust setup will be the same. The intake will obviously be different. I didn't install an intake manifold support bracket, as many members on Evom have not either. You make your own decision on that one. Make sure you use a new intake manifold gasket.
Congrats, you don't have that shit steel manifold on your car anymore. Now swap the old reluctor out with the new Evo camshaft reluctor. Go ahead and rtv the reluctor housing to prevent leaks.
You're going to have to extend your camshaft position sensor wires now, as the sensor faces the other way now. Also, connect the grounds that used to bolt to the SOHC head on the DOHC head somewhere as well. I used one of the reluctor bolts to ground them out, and I had to extend them as well to reach the bolt.
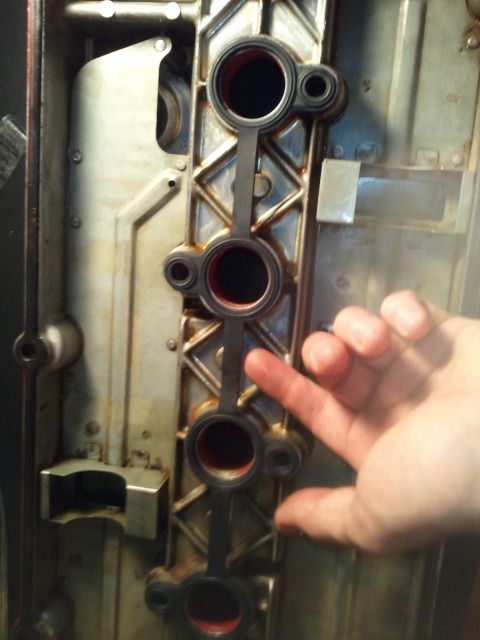
Tighten up your valve cover with the new gaskets. Make sure you replace these as well
You will now have to repin your TPS. The information has already been written here, the guy did a good write-up, probably better than this lol
http://www.club3g.com/forum/3g-eclip...-pin-outs.html
Install the evo fuel rail and your choice of injectors. You turbo guys know the deal with this, and the NA guys, just use your stock hardware. The rail works with stock injectors, and the FPR is just as good as my Aeromotive. As a matter of fact, I removed the Aeromotive and now run the Evo fpr. It works great. Install the fuel feed and return lines that you should have gotten with your rail. If you didn't, but a section of fuel hose and mock them up with a clamp and a brass fitting.
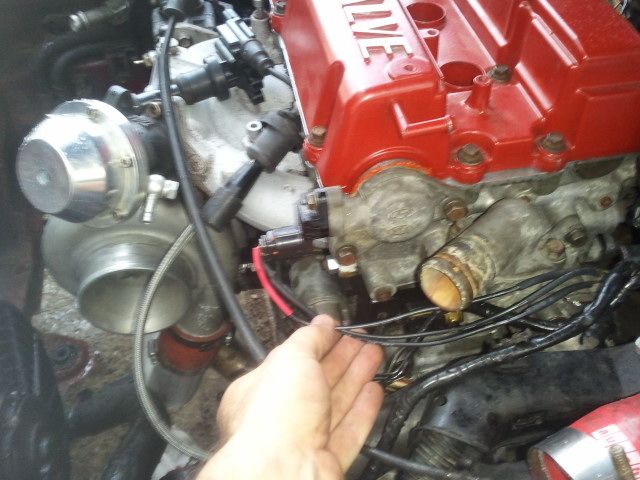
Reconnect all the wires on your intake manifold sensors. I personally deleted my EGR setup, so I only had vacuum lines to connect, the tps, the iacv, and the map sensor. All those wires fit fine and needed no extending.
Your PCV valve now exits out the valve cover facing the firewall. The pcv valve makes a 90 degree bend right into the intake manifold under the FPR.
As far as radiator hoses go. You can cut your OEM lower radiator hose to fit the upper thermostat housing now, and I believe people are using the OEM EVO hose. Just mock the bends up with a coat hanger and go to the store to find a match. I'm using a civic-half-radiator, so I didn't have to do any of this. Install the coolant temperature sensor on the lower hose near the thermostat housing. You can screw the OEM sensor into this. You will have to ground the adapter out. Connect a wire from the little screw hole to the grounding point on the head. If you do not do this, you will have no temp reading on the dash.
The throttle cable bolts right up to the new intake manifold, but I had to grind the bracket to fit and it puts a funny bend on the cable itself. I recommend just getting the Evo throttle cable as I hear it fits without an issue and is the correct cable for the DOHC setup.
Refill all your fluids, burp the cooling system, and check over everything. I don't think I missed everything, but I went through this thing quick. I will add more pictures and detail on the finishing touches as soon as the snow clears and I can get to the car again. Good luck
'00 Mitsubishi Galant ES 4g64T (Samantha)
'01 Mitsubishi Galant ES 4g64 (Daily)
'02 Mitsubishi Galant ES 4g64 (SCRAPPED)
'00 Mitsubishi Galant ES 4g64 (SCRAPPED)
'91 Volvo 740 Turbo B230FT (SOLD)
'88 Mitsubishi Mighty Max (SOLD)
'91 Kawasaki ZX7 (SOLD)
'95 Kawasaki ZX9R
 Posting Rules
Forum style by ZTech
 Log in
 Register


 2000 Mitsubishi Galant ES
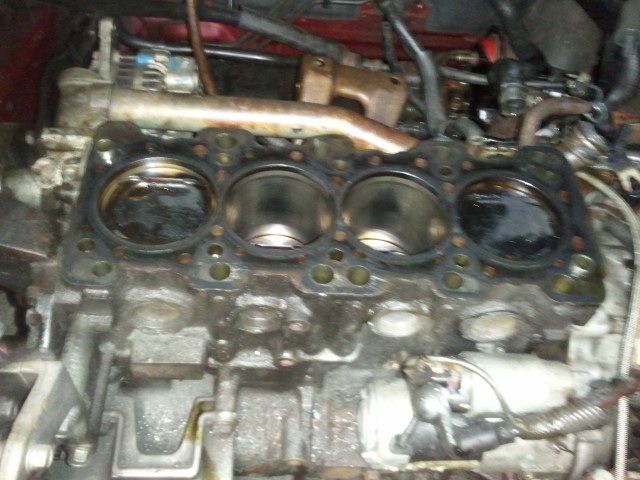


 Reply With Quote
Bookmarks